


Blogs


If you call me and say, “I just want a metal garage, shop, barn, or farm building in Idaho. What will the permit cost?”, my honest answer is this: there is no single Idaho number. Idaho uses statewide adopted building codes, but permits are enforced locally, and local jurisdictions can amend certain provisions for local concerns. That is why the same steel building can price and review differently in Boise, Canyon County, Idaho Falls, or a rural county.
Key highlights
-
Idaho follows statewide adopted building codes, including the 2018 International Building Code, 2018 International Residential Code, and 2018 International Energy Conservation Code, but local governments handle permitting.
-
Permit cost is usually not one fee. It can include an application fee, building permit fee, plan review fee, engineering, foundation design, and sometimes separate site, fire, grading, or reinspection charges.
-
Idaho jurisdictions commonly require engineered plans for metal buildings. Ada County says all steel buildings must be engineered, including foundation design, and Canyon County says all metal or steel structures require engineering plus an engineered foundation plan..
-
Small shed exemptions exist in some places, but they usually do not help with full-size metal garages, RV covers, barns, or workshops. In Nampa, for example, the detached storage-building exemption is under 200 square feet and under 12 feet tall, and any permanent electrical, plumbing, or HVAC still triggers permit requirements.
-
Agricultural buildings can be exempt in Idaho, but “exempt” does not always mean “no paperwork.” Idaho law allows counties to require permits for setbacks and utility easements, and counties like Minidoka and Lemhi still require siting or site-related review for qualifying ag structures.
Why Idaho permit pricing feels confusing
The first thing to understand is that Idaho is a statewide code state, but not a one-price state. The state has adopted the core codes, yet local governments issue permits and perform enforcement. Idaho law also lets local jurisdictions amend certain provisions to address local concerns, which is why design expectations can shift from one county or city to the next.
That matters in real life. A metal shop in a lower-snow valley location may not face the same structural questions as a similar building in a mountain county. The shell size might be identical, but site conditions, local design criteria, setbacks, drainage, snow, wind, and fire-related review can change what your permit office wants to see and what it charges to review.
What “permit cost” usually includes in Idaho
When customers say “permit cost,” they are usually mixing together several different expenses. That is where budgets go sideways.
1) Application or intake fees
Some jurisdictions charge an upfront filing fee just to start the process. Kootenai County , for example, lists a non-refundable permit application fee of $141. Canyon County also uses a plan review deposit, and once staff has reviewed the plans, that deposit is not refundable.
2) Building permit fee
Many Idaho jurisdictions base the permit fee on project valuation, not just building size. Boise’s building fee schedule is valuation-based, and Canyon County says valuation includes the total value of construction work plus finish work, roofing, electrical, plumbing, heating, air conditioning, fire-extinguishing systems, and other permanent equipment. That means every add-on can affect the permit math.
3) Plan review fee
This is where buyers get surprised. In Boise, commercial building plan review is 65% of the building permit fee, while residential plan review for one- and two-family dwellings, townhouses, and accessory structures is 20% of the building permit fee. Canyon County uses a different structure: 16% of the building permit fee for one- and two-family dwellings and accessory structures, and 65% for other occupancy uses. Idaho Falls also lists separate site plan review and structural plan review fees.
4) Engineering and stamped plans
For metal buildings, your plan cost often starts before the permit office even touches the file. Ada County says all steel buildings are required to be engineered, including a foundation design. Canyon County says all metal or steel structures require engineering for the structure and an engineered foundation plan. In other words, a basic sketch is usually not enough for a real steel building permit package.
5) Extra reviews, revisions, and inspections
Permit offices may charge more if you revise the plans, fail inspection, or start work too early. Boise charges hourly fees for additional plan review after the third review or when modifications are made after permit issuance, and it also charges a special investigation fee equal to 100% of the permit fee for work that starts before a permit is issued. Boise also lists reinspection fees.
Real Idaho fee examples, so you can budget smarter
Here is the practical takeaway: do not trust one statewide dollar figure you found in a forum or on social media. Idaho’s official local schedules already show why that approach fails.
-
Boise: building permit fees are valuation-based; residential plan review is 20% of permit fee, commercial plan review is 65%, and additional review or revisions can add hourly charges.
-
Canyon County: valuation includes more than the shell, there is a $180 plan review deposit for new dwellings and commercial structures, residential and accessory plan review is 16%, and other occupancy uses are 65%.
-
Idaho Falls: site plan review is listed at $70, and structural plan review is listed at $0.16 of building permit valuation.
-
Kootenai County: the permit application fee is $141 and non-refundable.
So when I talk to a customer in Idaho, I tell them to separate the budget into three buckets: jurisdiction fees, engineering and plan-set costs, and site or foundation costs. That gives you a much more realistic number than asking, “What does the permit cost?”
What Idaho permit offices usually want in your plan set
A lot of permit delays happen because the buyer has a building quote, but not a permit-ready package.
Boise’s accessory-structure checklist is a good example of what many Idaho permit offices expect: site plan, floor plan, foundation plan, roof framing information, wall sections, elevations, footing details, anchor details, and distances to property lines and nearby structures.
That is a big deal in the metal building world, because plenty of garages, workshops, RV covers, and equipment sheds go over 10 feet in wall height. If your building is tall, wide-span, customized, or outside prescriptive wood-framing rules, plan cost goes up because the engineering burden goes up.
For homeowners, the small-building exemption usually does not solve the real problem
Some buyers hear “under 200 square feet” and assume they can skip permits. Sometimes that is true for very small detached storage structures, but it is not a shortcut for most metal building projects.
In Nampa, the exemption listed for detached storage buildings is less than 200 square feet and not over 12 feet in height. Nampa also says any accessory structure of any size needs a permit and approved permanent footing or foundation if it has permanent electrical wiring, plumbing, or HVAC. So even a smaller building can move back into permit territory once utilities or a permanent foundation enter the picture.
That is why this exemption rarely helps with what most Idaho buyers actually want, such as a metal garage, enclosed workshop, livestock shelter with utilities, RV cover, or a storage building with real long-term use.
For farmers, “ag exempt” still needs careful review
Idaho law says local governments must exempt agricultural buildings from the building codes covered in that chapter, but counties may still issue permits for farm buildings to confirm road setbacks and utility easements, and the cost of those permits cannot exceed the actual cost to the county of issuing them.
Minidoka County is a good example. It says a qualifying agricultural building is exempt from a full building permit, but the owner still needs a Siting Permit in place of a full building permit to address setbacks and siting.
Lemhi County goes further and makes the limits very clear. Its ag exemption packet says exempt ag buildings cannot be used for human habitation, public use, a personal-use garage, or a machinery repair shop. It also says ag buildings must still conform with minimum snow, wind, frost, seismic, and other engineering requirements for safety, and the owner must obtain a site permit.
Madison County’s 2025 ag-exempt application also notes a minimum review period of ten working days after a complete submittal. So even when a building qualifies as agricultural, it is still smart to budget time for review and not assume same-day approval.
Here is the simplest way I explain it to Idaho farmers:
-
A hay shed or equipment shelter on true ag land may qualify for exemption.
-
A personal garage, public-use building, repair shop, or habitable space usually does not qualify.
-
Even exempt ag buildings may still need site placement review, setbacks, and safety-related engineering.
What drives plan costs higher on a metal building in Idaho
This is the part I want every buyer to understand before ordering.
Building height and span
Taller walls, wider spans, and custom openings usually mean more engineering. Boise calls out engineering for accessory structures with walls over 10 feet.
Foundation design
A lot of buyers think the building package is the whole story. It is not. Idaho jurisdictions commonly want foundation information, and Ada County specifically says steel buildings require engineering including foundation design.
Site conditions
Setbacks, floodplain conditions, grading, drainage, and overlay requirements can create extra drawings and extra review.
Plan revisions
Late changes cost money. Boise charges hourly fees for additional plan review after repeated reviews or post-issuance plan changes.
The biggest mistakes I see Idaho buyers make
- Buying the building before checking the site.
A perfect building on the wrong parcel still becomes a permit headache. Setbacks, access, floodplain, and local overlays matter.
- Assuming the shell quote includes a permit-ready foundation package.
Many Idaho offices want structural and foundation engineering. Confirm it early.
- Using the wrong engineer stamp.
Canyon County says it does not accept out-of-state engineering stamps for plans that require engineering.
- Assuming “ag exempt” covers everything rural.
It does not. Use matters, zoning matters, and counties may still require siting review.
- Starting work before the permit is issued.
That can trigger major extra charges. Boise’s special investigation fee is a good reminder of that risk.
My practical advice before you order a metal building in Idaho
Before you place the order, get answers to these five questions:
-
Is my building classified as residential accessory, agricultural, commercial, or something else?
-
Does my jurisdiction want full engineered plans, an engineered foundation plan, or both?
-
Are there site issues, like setbacks, grading, floodplain, wildfire area, or drainage, that trigger extra review?
-
Will my engineer stamp need to be from an Idaho licensed engineer?
-
What will I pay separately for application fees, plan review, inspections, and revisions?
That five-question check will save you more time and money than chasing a random statewide “average permit cost.”
How EMB can help you stay ahead of the Idaho permit process
At Engineered Metal Buildings, the smart move is to design the building around your actual location and intended use, not around a generic online price. EMB’s product setup is built around customizable pre-engineered steel buildings, a 3D Building Designer, and location-sensitive pricing.
We also point buyers to resources for site prep, snow and wind loads, ordering process, and FAQs, which is exactly the kind of prep work that helps before permit submittal.
Conclusion
If you remember one thing, remember this: metal building permit and plan costs in Idaho are local, layered, and heavily affected by engineering requirements.
The building permit fee is only one piece. Real Idaho costs can also include application fees, plan review percentages, site-plan review, structural review, engineered drawings, foundation design, and revision charges.
So before you buy, match the building to your parcel, your use, and your jurisdiction. Then get your quote, engineering, and permit path lined up in that order. That is how you keep an Idaho metal building project moving without expensive surprises.
FAQs
Do metal buildings need a permit in Idaho?
Yes, in most cases. Idaho follows the International Building Code, and any permanent structure used for commercial, industrial, or residential purposes will require a building permit.
How much is a metal building permit in Idaho?
Permit fees vary widely by jurisdiction and are typically calculated based on the total valuation of the project.
What is the difference between a permit fee and a plan review fee?
A permit fee covers the cost of inspections during and after construction. A plan review fee is a separate charge for the time it takes a building official to review your submitted drawings and engineering documents before a permit is issued.
Do agricultural metal buildings need permits in Idaho?
Idaho has exemptions for certain agricultural structures, particularly those used for farming, ranching, and storage of equipment or livestock on working agricultural land. However, the exemption has conditions and doesn't apply universally.
Can I use plans stamped by an out-of-state engineer?
Idaho does not automatically accept stamps from engineers not licensed in Idaho.
Can I put up a small metal shed in Idaho without a permit?
Possibly. Many Idaho jurisdictions exempt small accessory structures

You don’t have to spend weekends driving from one dealer to another or wait days for someone to call you back. These days, you can buy your metal building without ever leaving home.
The process is online now. Faster. More flexible. And you stay in control from start to finish.
Planning a workshop? Need a garage? Maybe a barn? Ordering online saves time, often saves money, and gives you far more options than most local suppliers can offer.
Why More People Are Buying Online
- Shop whenever it works for you.
- Find better deals, with discounts only offered online.
- See more choices in styles, sizes, and layouts than you’d find in person.
Once you start designing, everything’s laid out clearly. Change the size. Switch the roof style. Test out different colors. Every option is right in front of you. When it looks the way you want, you can place your order on your schedule, no pressure, no waiting.
Seamless Online Shopping Experience
Our e-commerce platform is designed to guide you through the process step by step. First, you choose the type of building you need. From there, every option is user-friendly and clearly builds size, lean-tos, roof style, doors, windows, all with live pricing as you make changes. And when you’re done, the checkout is fast. No forms that ask for the same thing twice. No waiting around.You’ll also be able to follow your progress, from start to confirmation.
What stands out:
- The layout is clear, so you know exactly where to begin.
- Prices update instantly as you change features.
- The entire order process only takes a few minutes once you’re ready
Fully Customizable Metal Buildings
Ordering a metal building online isn’t just convenient; it lets you make it exactly how you want it. No sticking to a handful of pre-set models. No “close enough” designs. You can start small with a backyard shed or go big with a commercial building, and everything in between.
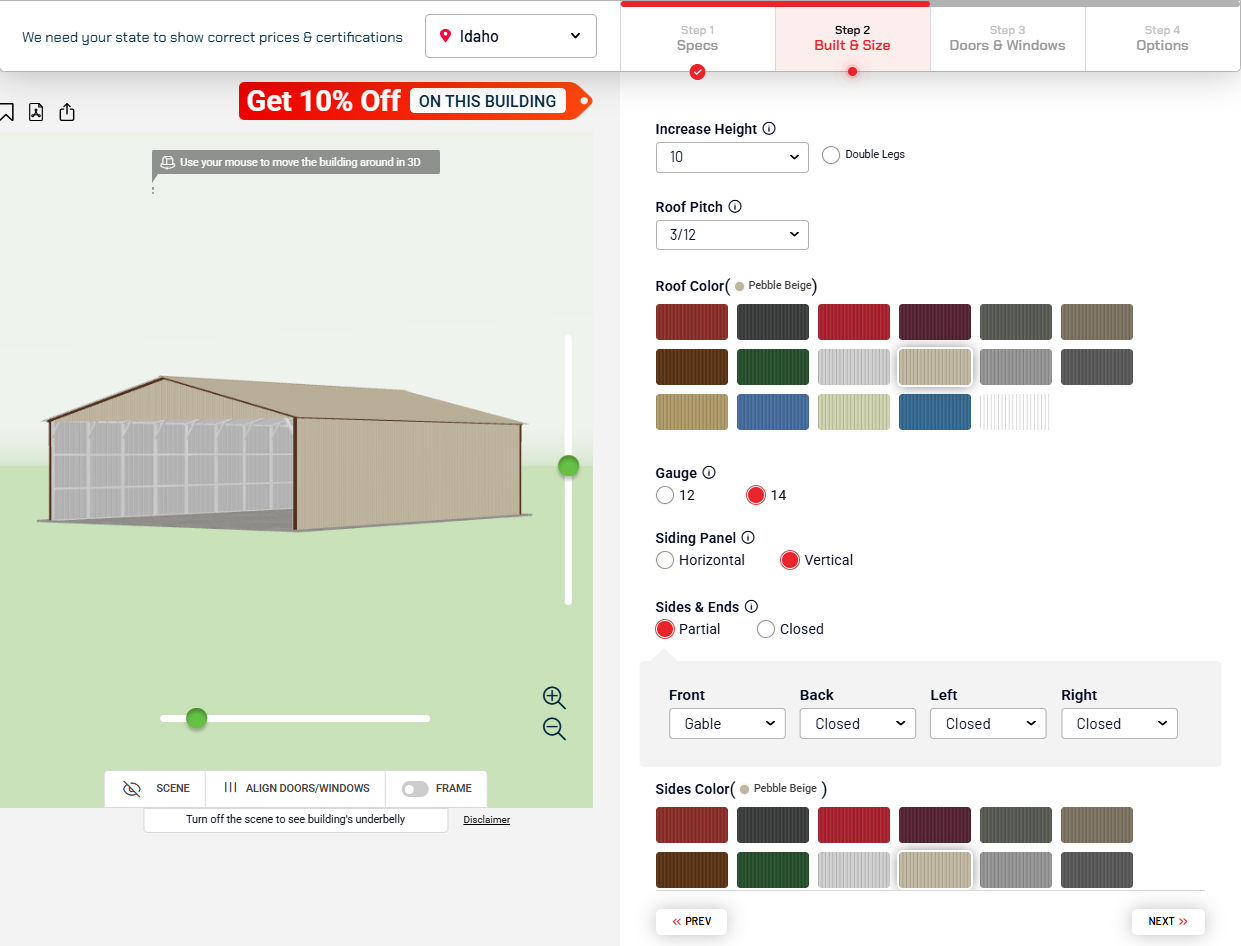
From the first click, you’re in control. Change the size. Pick your roof style. Add the number of doors and windows you need. Adjust the colors until they fit your property perfectly. As you make changes, you’ll see the updates instantly on your screen.
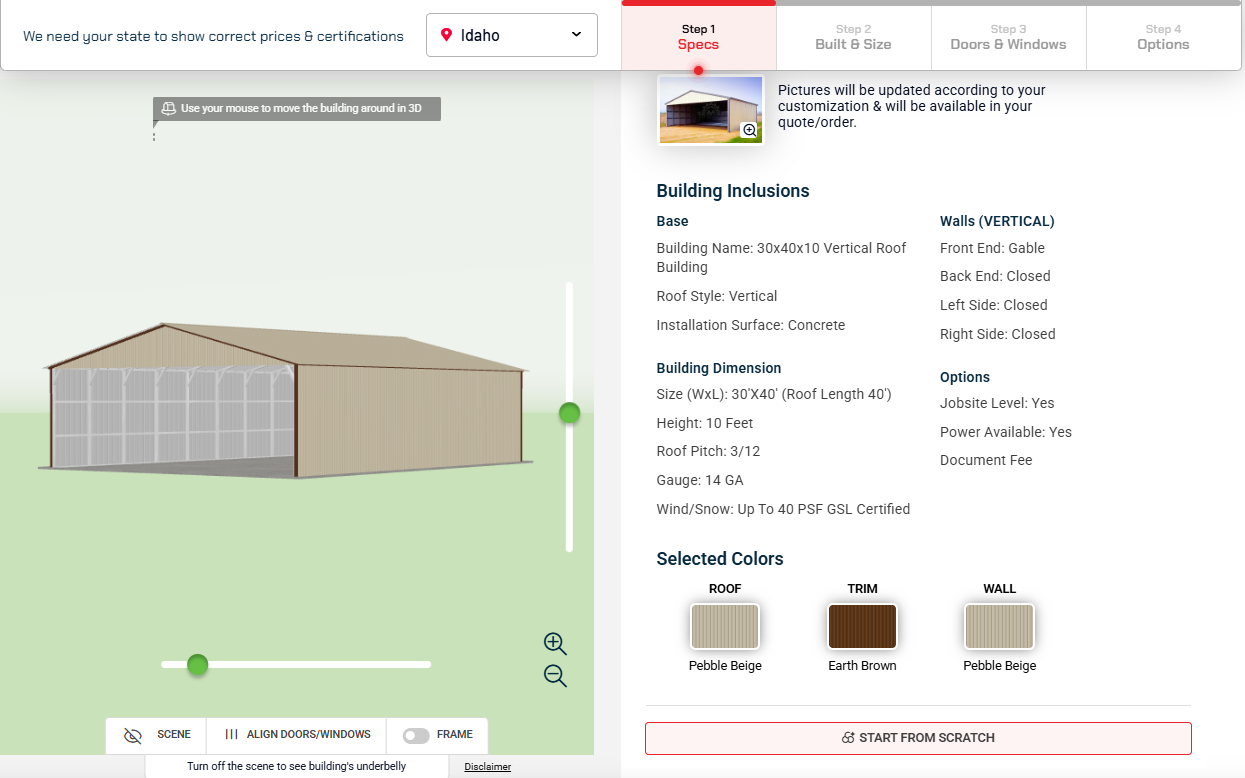
There’s also a 3D design tool built in. You can spin your building around, zoom in on the details, and get a clear picture of what it’ll look like before you place the order.
Want specifics? You can choose dimensions like 30×40 or 40×60, or type in your own measurements. Go vertical or regular on the roof. Match the roof, wall, and trim colors to your taste. Add the right openings, frame reinforcements, or both. And with the live 3D view, you’ll see your vision take shape right in front of you.
Certification & Insulation – Built for Where You Live
Metal buildings are built to last, but you can add more protection and comfort depending on how you plan to use the space.
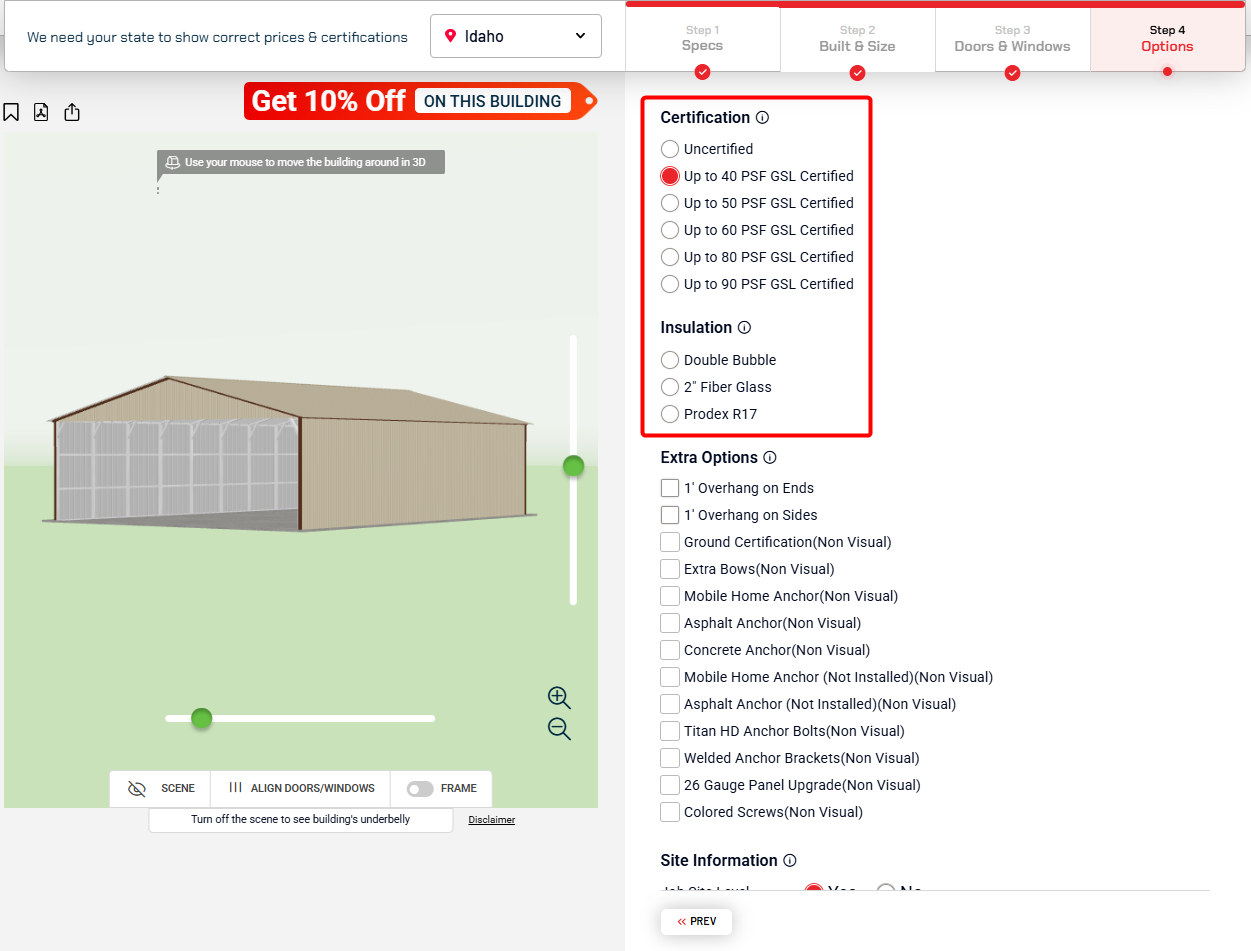
You can order your building with a higher certification rating so it’s engineered to handle those tougher conditions. That rating isn’t just a number, it’s peace of mind that your structure is ready for what your climate throws at it.
Insulation is a smart upgrade if you will be working inside or storing sensitive items that are temperature-sensitive. It keeps summer heat out, brings warmth in during winter, and makes the building space more comfortable overall.
Upgrades include:
- Higher-rated certification — Up to 40 PSF or more, meeting strict building codes.
- Insulation options — Double Bubble for basic thermal control, 2-inch fiberglass for better coverage, or R17 Prodex for maximum efficiency.
Both options are easy to add during design. You’ll see exactly how they fit into your build before you finalize the order.
Transparent Pricing & Flexible Payment Options
You’ll see the full cost of your building right away with no surprises later. This price covers the building itself, installation, and any extras you’ve chosen, like site preparation, color upgrades, or added structural features.
Paying is just as flexible. Put down a deposit or set up monthly financing. Choose what works best for your budget.
From time to time, seasonal discounted sales comes on site. On medium to larger structures, those discounts can really make a difference.
What you’ll notice:
- Clear breakdown – Every part of the order is itemized so you know exactly what you’re paying for.
- Different payment paths – Start with a deposit, or finance it over time.
- Discount opportunities – Watch for promotions, some going as high as 15% off.
The goal is simple: make buying your building straightforward from the very start.
Add-Ons to Make Your Building Work Better for You
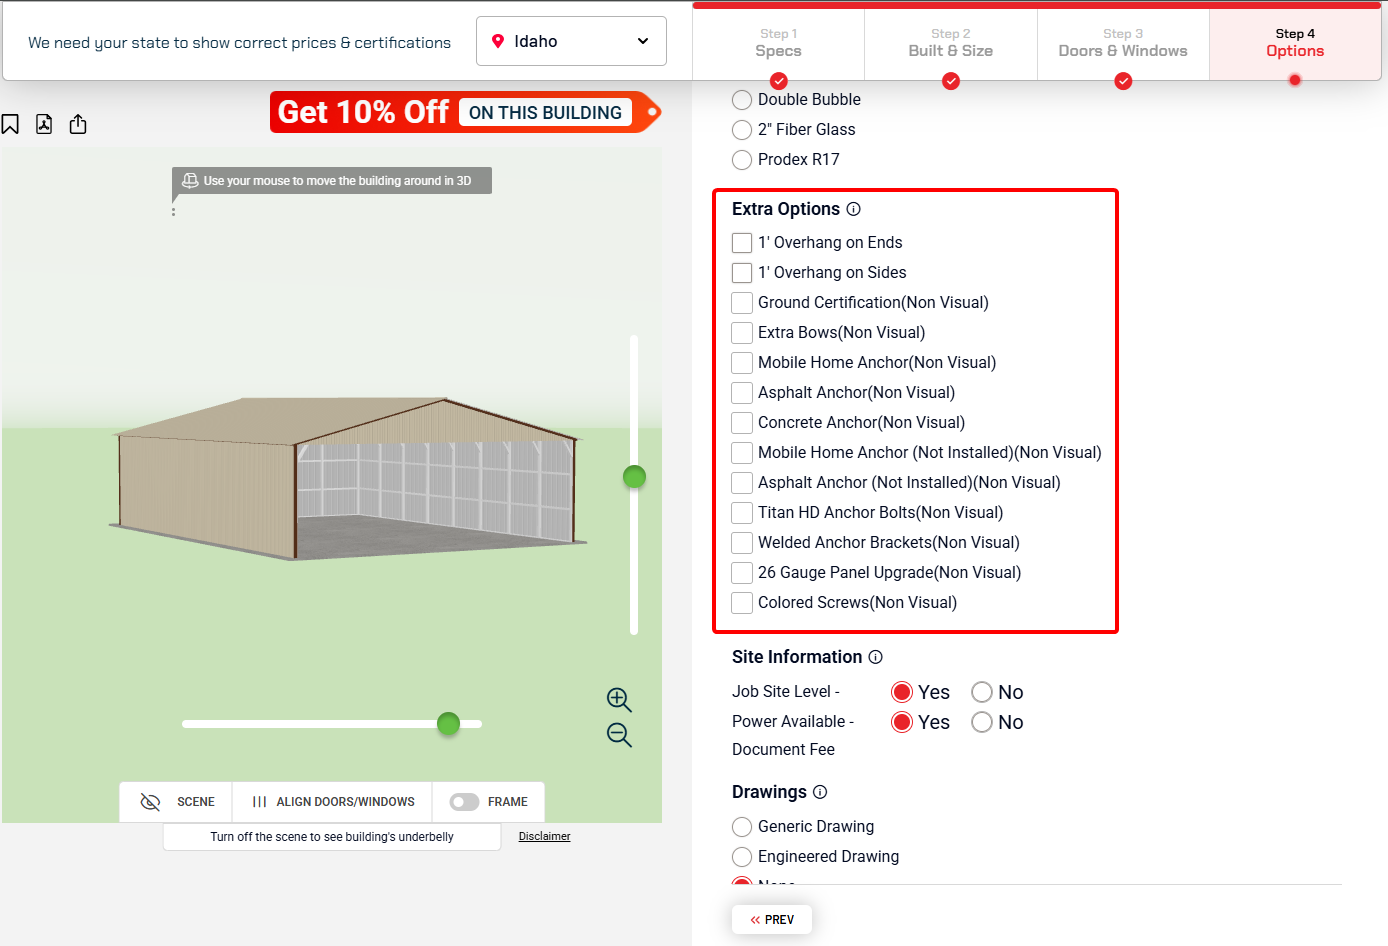
Every building starts with a solid base design. You can make upgrades that add strength, improve the design and looks, or extend its lifespan.
If you live in an area where winds hit hard, or you just want a durable setup, you can grab addons that include extra bows or mobile home anchors for added stability. Overhangs are another option - they provide additional coverage on the sides or ends and can alter the building's appearance.
You can also choose to add warranty coverage during checkout. That extra protection can help guard against rust-through or panel issues over time.
Some of the upgrades people often choose include:
- Extra structural support — Additional bows or anchors to reinforce the frame.
- Overhangs — Custom lengths on the sides or ends for more coverage and shade.
- Warranty coverage — Protection for rust and panel wear for longer peace of mind.
Not every project needs these, but in the right situations, they can be a smart addition.
Wrapping Up Your Order
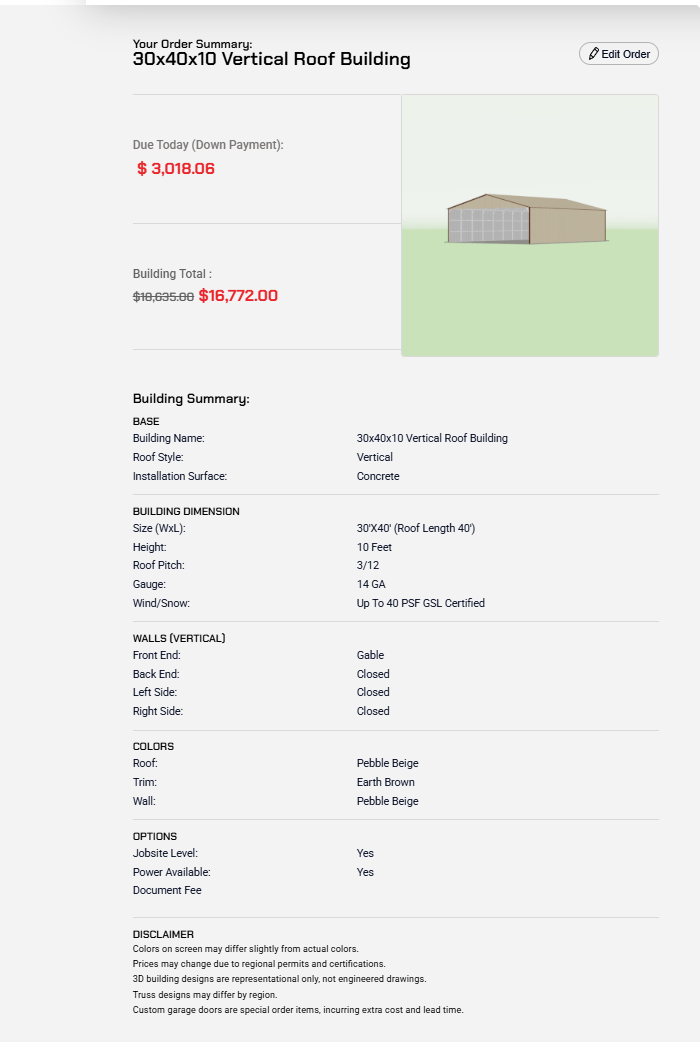
Once your building design is set, the last step is quick. You’ll see a single page showing every choice you’ve made - size, roof style, colors, doors, windows, and any extras.
Take a moment to check it over. If it all looks good, click “Buy Now” and fill in the required details to lock in your order. Right after, you’ll get a confirmation of your order.
From design to checkout, it’s just a few clicks - and you’re done.
Here’s what you’ll get before you finish:
- Order summary – All the specs you picked, listed in one place for easy review.
- Confirmation details – Your delivery timeline and follow-up instructions so you know what to expect.
Visual Tools That Help You Decide
When you’re making a major purchase like this, seeing exactly what you’re getting matters. You want to be confident in your choices before committing — and the design tools make that possible.
You can view your building in 3D and spin it around to check every side. Change the colors. Swap features in or out. Zoom in to see the close details. The building images are sharp enough to show you the trim lines, roofing, and finishes clearly.
With these tools, you’re not guessing — you’re designing with your eyes open.
What’s available:
- 3D viewer – Rotate your design in real time while you build it.
- Detailed product images – See rooflines, trims, and doors up close before ordering.
- Live color selection – Switch colors instantly and preview the changes right away.
It’s the next best thing to standing in front of the finished building — without spending a dollar until you’re sure.
Customer Support & FAQ – Here When You Need Us
Questions happen. Sometimes it’s right at the start, before you’ve even picked a size. Other times it’s mid-checkout, when you want to double-check a detail.
You won’t be left figuring it out alone. We have an FAQ with straight, practical answers - from how to buy a metal building, how to tweak a design, to payment steps, what the lead time is, to what the installers will do on site. No long-winded explanations. Just what you need to know.
If you’d rather talk it through, use the live chat. You’ll be connected with someone who actually knows the process and can walk you through it without making you wait for an email reply.
Here’s what’s in place:
- Live chat – Quick connection to a support rep who can give you clear, direct help
- FAQ section – Plain answers on design options, payment methods, installation timelines, and more.
The help’s there. The moment you need it. So you can keep moving and get your building sorted without the guesswork.
Ready to Start?
Once you’ve had a look at the options, getting your design underway is straightforward. You can start right now, or step away and come back to it later — your progress will be waiting.
Everything is set up to keep the process simple. From customizing your building, to seeing the price update in real time, to checking out - it’s all built for flexibility.
Doesn’t matter if it’s a small backyard shed or a full-scale commercial build — the tools are ready when you are.
Click “Customize Your Building” and take the first step.

RV carport height isn’t something you want to eyeball or guess. Being off by even a small amount can turn into a daily hassle. Before committing to a design, the smartest move is to measure your RV yourself and work from real numbers instead of assumptions.
Key Highlights
- RV height should always be measured by hand, not pulled from a brochure
- Roof accessories often make RVs taller than expected
- Clearance matters just as much as the RV’s actual height
- Roof style changes how much usable space you have inside the carport
- Planning ahead helps avoid rebuilding later
Finding Your RV’s Overall Height
This part matters more than anything else. Many RV owners assume they already know their rig’s height, but real-world measurements are often different. Add-ons, ground conditions, and even tire wear can change things. Taking a few minutes to measure properly now can prevent expensive mistakes later.
- Measure RV Height
Park your RV on flat ground and grab a tape measure. Measure straight up from the ground to the tallest point on the roof. This usually isn’t the roof itself, it’s the air conditioner, vent cover, antenna, or satellite dish. Measure slowly and double-check your work.
- Add Clearance
Once you have the true height, don’t stop there. Add some clearance. Most people aim for an extra 6 to 12 inches. That buffer helps with uneven slabs, suspension movement, and pulling in without stress. It also gives you flexibility if you add gear later.
- Convert RV Height to Recommended Leg Height
Your RV height plus clearance gives you a target number. From there, roof style and pitch come into play. Those factors determine how tall the legs need to be so the lowest point of the roof doesn’t interfere.
Roof Style and Usable Height
Two carports can have the same leg height but very different interior clearance. The roof shape changes everything. Let’s look at some of the common styles and how they affect your interior height:
- Regular Roof
Regular roofs have a softer curve and lower pitch. You get decent height in the middle, but usable clearance drops near the sides. It works for shorter RVs, less so for taller ones.
- A-Frame Roof
A-frame roofs use a sharper pitch. That gives you better center clearance without dramatically increasing leg height. It’s a common upgrade when RV height is close to the limit.
- Vertical Roof
Vertical roofs have the steepest pitch. They offer the most usable height overall and handle rain and snow better. For tall RVs, this option leaves the most breathing room.
Common RV Height Ranges
Most RVs fall into a general height range, but accessories can push them higher. These ranges give you a starting point.
| RV Type | Typical Height | Suggested Carport Leg Height |
|---|---|---|
| Travel Trailer | 10’–11’ | 12’ |
| Fifth Wheel | 12’–13’ | 14’ |
| Class C Motorhome | 11’–12’ | 13’–14’ |
| Class A Motorhome | 12’6”–13’6” | 14’–16’ |
A Checklist for RV Carport Prep
Before installation, it helps to slow down and look at the site itself. A solid plan makes the build smoother and prevents last-minute changes that cost time or money.
- Site prep – Make sure the ground is level and accessible
- Slab thickness – Concrete should support both the RV and anchors
- Drainage – Water should flow away from the pad, not pool
- Gutters – Helps control runoff and protect the slab edge
- Future needs – Consider taller RVs or partial enclosures later
Design Your RV Carport the Right Way with Our 3D Designer
Designing on paper only gets you so far. Using the 3D designer lets you actually see how leg height, roof pitch, and layout work together. You can tweak dimensions, change roof styles, and catch issues before anything is built. All from home, on your schedule.
Try our 3D Designer to get a custom RV carport quote matched to your zip code.
Carport Height Matters
RV carport height isn’t about picking a random number. It’s about knowing your RV, allowing for clearance, and choosing a roof style that gives you usable space. Measure carefully. Plan for the future. When those pieces line up, your finished carport fits the way it should, without stress or second guesses.
Want to know more about picking the best height for your RV carport? Call our experts at (208) 572-1441 to get started.

When buyers start talking about building height, the conversation can get confusing fast. One person is thinking about wall height. Another is focused on the roof peak. Someone else just wants enough room inside to park equipment. All of those ideas fall under “height,” but they’re not the same thing.
On top of that, local building departments set rules that can override personal preferences. Those rules are usually tied to wind exposure and snow load. Whatever height you settle on has to work within those limits.
Key Highlights
- Building height is measured in more than one way
- Sidewall height doesn’t always equal usable space
- Roof pitch affects total height more than expected
- Doors often determine minimum wall height
- Local codes influence allowable height
- Wind and snow loads are tied to height calculations
Metal Building Heights
Not all height measurements serve the same purpose. Some are used when ordering a building. Others come into play during engineering and permitting. Understanding the difference early helps avoid revisions later. Below, we break down these metal building heights:
Sidewall Height
Sidewall height is measured from the finished floor to the eave. This is the number most buyers reference when choosing a building. It impacts door placement and wall clearance, but doesn't include the roof structure.
Peak Height
Peak height runs from the floor to the highest point of the roof. It changes based on roof pitch and building width. Zoning regulations often reference this measurement.
Clear Height
Clear height describes the open vertical space inside the building. Framing, purlins, and insulation reduce it slightly. This is the height that matters for lifts, racks, and tall vehicles.
Mean Roof Height
Mean roof height is the average between the eave and the peak. Engineers use it when calculating wind and snow loads. It's rarely discussed by buyers, but it matters behind the scenes.
Roof Pitch and Type
Roof design plays a quiet but important role in overall building height. A small change in pitch can add noticeable height at the peak. Roof type also affects how weather loads are handled.
Gable Roof
Gable roofs slope up from both sidewalls and meet at the ridge. They're common because they balance loads well and provide extra height near the center.
Single-Slope Roof
Single-slope roofs rise from one side to the other. They're often chosen when height limits apply or when drainage needs to move in one direction.
Gambrel Roof
This roofing type offers a bit more headroom thanks to its four-panel roofs that are arranged in a barn-like arc.
Common Roofing Styles
- Regular Roofing: This is your basic roofing style. It’s economical and great for general storage, but isn’t designed to handle more than moderate weather.
- A-Frame Roofing: This roof features a steeper pitch and is much more suited for rain and snow.
- Vertical Roofing: Vertical roofing features vertically arranged panels that allow snow and storm debris to slide off your roof. It's one of the most expensive options, but it provides the best functionality.
Door Height and Equipment Clearance
Doors are where height issues usually show up first. A building can seem tall enough until tracks and framing are installed, so planning for clearance avoids that problem.
Roll-up Door Height
Roll-up doors need space above the opening for tracks. A door listed at 12 feet typically requires additional wall height.
Framed Openings
Framed openings allow flexibility in door size and placement. They also affect how loads are distributed around the opening.
Oversized Vehicles
Taller vehicles, such as RVs, trailers, and motorhomes, require more than door clearance alone. Interior framing and roof slope reduce usable height.
Choosing the Right Height by Use
Height should match how the building will actually be used. Storage needs, access, and future plans all factor in.
| Building Type | Typical Height Range | Common Use |
|---|---|---|
| Residential Metal Garages | 8’–10’ | Vehicles and workshops |
| RV Storage | 12’–16’ | Motorhomes and trailers |
| Metal Barns | 10’–14’ | Equipment and livestock |
| Commercial Metal Buildings | 12’–20’+ | Operations and storage |
Why Building Height Matters for Wind and Snow
Building height affects how wind and snow interact with the structure. Taller walls catch more wind. Roof height changes how snow accumulates. Local building officials account for this when setting requirements.
- Wall height impacts wind exposure
- Roof height affects snow drift (ground snow loads map)
- Mean roof height is used in load calculations
- Taller buildings may need added bracing
EMB Metal Buildings can help guide you through these requirements and plan a building that meets local codes. Call us today at [phone number] for more information.
Quick Height Planning Checklist
Before finalizing height, it helps to think through real-world use.
- Purpose of the building
- Door sizes
- Interior clearance needs
- Local zoning limits
- Wind and snow load rules
- Roof pitch selection
Design Your Own Building in 3D with EMB Metal Buildings
EMB Metal Buildings offers a 3D Design Tool that lets you plan your building from home. You can adjust height, roof style, doors, and more to perfect your structure’s layout in real-time. Once you’re done, simply send the final design to our building experts for a FREE quote.

When people hear certified metal building, they often assume it’s just a quality label. In reality, certification means your building has been engineered to meet the local building codes where it’s going to be installed. That’s a big deal, because those codes control whether a permit can be issued in the first place.
Permits are where most metal building projects either move forward smoothly or hit a wall. Counties, cities, and townships all follow different rules, and many won’t even review an application unless certified plans are included.
Once you understand how certification ties into wind loads, snow loads, and permitting, the process feels a lot more manageable. It stops being guesswork and starts becoming a checklist.
If you’re also budgeting a larger shop or storage build, see our full cost breakdown here: 40x60 Metal Building Cost in 2026: Real Price Ranges + What’s Included
Key Takeaways
- Certification means your building is engineered for local code compliance
- Most building departments require stamped plans before reviewing permits
- Wind and snow loads are calculated using ASCE and IBC standards
- Load requirements can change drastically between nearby locations
- Non-certified buildings often stall or fail during plan review
- Having documents ready upfront avoids repeat submissions
What Certified Metal Buildings Really Mean
A certified metal building is designed for where it will actually stand. Instead of relying on generic specs, your building is reviewed against local wind speeds, snow loads, exposure conditions, and intended use.
Certified vs. Non-Certified Buildings
Engineering Behind the Design
Certified buildings include calculations stamped by a licensed engineer. Non-certified buildings often rely on standard layouts that don't account for site-specific forces.
Permit Compatibility
Certified plans are typically accepted by building departments without major revisions. Non-certified plans often trigger requests for re-engineering or added documentation.
Structural Reliability
Certification confirms the building can resist uplift, drifting snow, and lateral pressure. Without it, performance is largely assumed rather than proven.
Future Flexibility
Certified buildings are easier to insure, modify, or sell later. Non-certified structures can create issues during inspections or upgrades.
Permitting 101 for Metal Buildings
Every permitting journey starts with the local authority having jurisdiction. This could be a city, county, or regional building office. Their job is to confirm that your building meets zoning rules and safety codes before construction begins.
To get started, you’ll usually submit engineered plans, site information, and load data for review. Once approved, the permit allows construction to legally move forward.
What you’ll typically need:
- Engineered and stamped building plans
- A site or plot plan
- Wind and snow load documentation
- Intended use and occupancy details
- Foundation information
Who to contact:
Start with your local building department or planning office. They can tell you exactly what they expect before anything is submitted.
Wind Loads Explained
Wind loads aren’t based on a single wind speed number. Engineers look at several factors, including exposure category, building height, roof shape, enclosure type, and risk classification, to make their determination. All of this falls under ASCE and IBC regulations, which most jurisdictions follow.
Changing something as simple as door size or roof pitch can shift the required wind rating. That’s why accurate information matters early on.
Call EMB Metal Buildings at (208) 572-1441 for local wind/snow load certification options.
Details to Confirm for Wind Load Engineering
| Item | Reason |
|---|---|
| Jobsite address | Determines local wind zone |
| Building use | Sets risk category |
| Roof style | Affects uplift forces |
| Eave height | Impacts wind exposure |
| Openings and doors | Influences internal pressure |
| Exposure rating | Accounts for surrounding terrain |
Metal Building Snow Loads
Snow load requirements take into account elevation, roof geometry, and drifting patterns. As a result, two towns in the same state can end up with very different requirements.
Roof Snow Load
This measures how much snow the roof must support. Roof slope, heat loss, and drifting all influence the final value.
Ground Snow Load
Ground snow load reflects historical weather data for a specific area and serves as the starting point for calculations.
Dead Load
Dead load accounts for the permanent weight of the building itself, including framing and panels.
Live Load
Live load includes temporary forces such as workers, tools, or short-term equipment on the roof.
Documents Required for Building Permits
Most permit issues live and die by the paperwork. Missing documents usually mean delays, which can impede your project timeline. For the smoothest results, you’ll want to have the following available when submitting an application:
- Engineered, stamped building plans
- Site or plot plan
- Wind and snow load calculations
- Foundation drawings
- Zoning or land-use approvals, if required
- Completed permit applications
Permit and Certification Checklist
Running through this quick checklist before submitting can prevent weeks of back-and-forth with the building department:
Checklist
- Contact local permitting authorities
- Confirm zoning and setbacks
- Define building use and occupancy
- Select building size and layout
- Choose roof style and eave height
- Verify wind and snow load requirements
- Choose foundation type
- Prepare site grading and access
- Compile all engineered documents
Common Reasons for Delays and How to Avoid Them
Delays usually happen when documentation is missing, information is off, or plans fail to meet requirements. Some of the most common issues include:
Generic Load Ratings
Submitting non-specific wind or snow data often leads to rejection. Site-specific calculations are expected.
Incomplete Site Information
Missing elevations or property details can stall reviews quickly.
Zoning Oversights
Structural approval doesn't override zoning restrictions. These need to be addressed early.
Foundation Conflicts
If foundation plans don't match engineered loads, revisions are almost guaranteed.
Metal Building Permit Costs
Permit costs vary by location, but most metal building projects fall into predictable ranges. Fees usually reflect review time, engineering requirements, and administrative processing.
| Cost Item | Typical Range |
|---|---|
| Permit application | $100 – $500 |
| Plan review | $200 – $1,000 |
| Engineer-stamped plans | $500 – $2,500 |
| Zoning or impact fees | $0 – $1,500 |
| Revisions or resubmittals | $150 – $600 |
FAQs About Certified Metal Building Permits
Knowing the basics upfront helps avoid surprises once the permit process begins. To give you the smoothest experience, we’ve answered a few of the questions we get most often:
What does the term certified metal building mean?
Answer: Certification means the building is engineered to meet local code requirements for safety and structural performance.
Do I always need a permit for a metal building?
Answer: Most permanent or occupied structures require one, even for agricultural or storage use.
Is a wind mph rating enough for a permit?
Answer: Usually not. Building departments expect full ASCE-based calculations.
What is metal building snow load, and why does it matter?
Answer: It guarantees the roof can safely support accumulated snow without structural failure.
Will certified plans guarantee approval?
Answer: They improve approval odds, but zoning and site compliance still apply.
Do 40x60 metal buildings require different wind/snow considerations?
Answer: Yes. Larger footprints and wider spans often increase load requirements.

A lot of people focus on the building package and forget what’s underneath it. That’s usually where the problems start. With a 40x60 metal building, the site work and the slab matter just as much as the steel. Sometimes more.
This page talks through what actually goes into site prep, what concrete work tends to cost, and why two projects that look the same on paper rarely price out the same in real life.
Key Takeaways – TL;DR
- Ground work can make or break a 40x60 project
- Concrete slabs are the most common foundation choice
- Soil, slope, and drainage change pricing fast
- Slab design matters more than people expect
- Slab and site prep costs are separate from 40x60 metal building prices
- Planning early avoids rework later
What Site Prep and Slab Work Really Includes
Site prep isn’t always clean and simple. Every property has quirks. Slight slopes. Soft spots. Access issues. For a 40x60 metal building, those details show up quickly once equipment hits the ground.
Clearing
Clearing means more than cutting grass. Trees, roots, brush, and old debris all have to go. Some sites take a day. Others take much longer.
Grading
The ground needs to be level and compacted so the slab stays put. If this step is rushed, cracks and settling tend to show up later.
Access
Concrete trucks don't squeeze into tight spaces easily. Long driveways, soft soil, or limited turnarounds can add cost without warning.
Foundation
This is the forming, reinforcement, and pour. The slab has to line up with the building layout and meet local requirements.
Common Foundation Types for 40x60 Metal Buildings
Most 40x60 buildings sit on concrete slabs. They’re solid, durable, and work well for enclosed structures. Other foundations exist, but they’re usually chosen for specific reasons, not convenience. These include:
- Soil and Gravel Foundations
Gravel bases are sometimes used for open buildings or storage. They're cheaper upfront but don't offer a finished floor or long-term stability.
- Asphalt Foundations
Asphalt shows up occasionally, usually in commercial settings and for residential carports and garages. It’s less common and doesn’t perform like concrete under constant load.
Budget Ranges for a 40x60 Metal Building
As a general range, a 40x60 metal building usually runs $11 to $25 per square foot for the base structure, with site prep and slab work added separately. These costs include:
| Average Price Range | |
|---|---|
| 40x60 Metal Building (Base Model) | $26,400 – $60,000 |
| Site Prep | $4,000 – $15,000 |
| Concrete Slab | $12,000 – $30,000 |
Site Prep Checklist
Before concrete shows up, a few basics should already be handled to prevent delays:
- Clear vegetation and debris
- Level and compact the site
- Plan drainage paths
- Decide where utilities enter
- Make sure trucks can access the site
- Pull required permits
- Use experienced concrete contractors
Cost Drivers for Concrete Slabs
Concrete costs don’t jump randomly. They rise because of:
- Thicker slabs and reinforced edges
- Rebar, mesh, and spacing requirements
- Soil prep and compaction work
- Vapor barriers and moisture control
- Wind, snow, or seismic codes
- Labor and material pricing in your area
Common Mistakes When Planning Foundations
Most foundation issues start long before the pour. Keep your eyes out for the following to minimize headaches or delays:
Slabs poured too thin
Thin slabs don’t hold up under real use. Cracks usually follow. That’s another reason it pays to hire professional contractors.
No drainage plan
Water around a slab leads to erosion and movement over time. Plan your drainage well ahead of time to reduce flooding and erosion.
Skipping soil prep
Bad soil doesn't fix itself. Test and compact your soil before laying a foundation.
Pouring before the building is finalized
Building plans can change, but if you’re locked into a concrete pad size, you may be in for major headaches.
EMB Metal Buildings Is Your Partner for Durable Metal Buildings
EMB Metal Buildings has years of experience delivering high-quality metal buildings. Our structures are certified against the wind and snow in your region, customized to fit your project type, and built to last for years, keeping your things safe.
If you’d like to speak to one of our building experts, call us today at (208) 572-1441. Or design your building on your own with our 3D Designer tool.
FAQs About Metal Building Site Prep
Do you have questions about preparing your building site for a 40x60 metal building? We want you to be sure when you buy, so we’ve answered a few of the most common questions on the subject:
- How much does a 40x60 concrete slab cost?
Answer: Most land somewhere between $12,000 and $30,000, depending on thickness, reinforcement, and site conditions.
- How thick should a slab be for a fully enclosed 40x60 metal building?
Answer: Four to six inches is common, often with thicker edges. Local codes can change that.
- Should my slab be bigger than the building?
Answer: Sometimes. Extra space can help with drainage and future use.
- Do I need a vapor barrier under a slab?
Answer: Often yes, especially for enclosed buildings.
- What site prep should be done before the crew arrives?
Answer: The site should be cleared, leveled, compacted, and accessible.
- How do wind and snow codes affect the slab?
Answer: Higher loads usually mean more reinforcement and thicker concrete.
- Can I pour concrete before finalizing the building design?
Answer: That’s risky. Final plans should be set before the pour.

You want straight answers and practical specs. Here’s the real-world guide contractors, farmers, and homeowners use when planning a 30×40 (1,200 sq ft).
Want an itemized quote for your zip code?
Use our 3D Design Tool or call (208) 572-1441.
TL;DR
- Typical 2026 price for a 30×40 (1,200 sq ft):
DIY kit: about $18,000–$30,000
Installed: about $28,800–$51,600
Complex loads or premium options can push totals higher. - Concrete slab (4–6 in): about $7,200–$14,400 installed, depending on region and finish.
- Lead times: many tubular cold-formed building installs land in the 4–10 week range depending on region and season.
- Permits: many jurisdictions use I-Codes with local amendments and design loads tied to ASCE 7.
Start by confirming your local wind/snow requirements: Check snow & wind loads. - Financing: options vary, but many buyers use financing for the building + slab. See Financing and Rent-to-Own.
What Fits Inside a 30×40
1,200 sq ft is a popular footprint with a lot of flexibility. Clear span is common. A 10–12 ft eave height covers most pickups with racks.
| Use case | Typical layout | Notes |
|---|---|---|
| Two cars + workshop | Two 10×10 roll-up doors on gable end, 1 walk door, 1–2 windows | 12 ft center aisle works well for tool benches |
| Truck + tractor bay | One 12×12 roll-up, one 10×10, 12–14 ft eave | Consider vertical roof and heavier framing in snow/wind areas |
| Small business shop | 1 or 2 10×10 doors sidewall, 1 office corner | Insulate roof at minimum to help control condensation |
| Storage | Single 10×10 door, no windows | Cheapest enclosed configuration |
Door price reality check:
- A 10×10 roll-up commonly prices around $1,100–$1,300
- A 12×12 door is often $1,300–$1,900+ depending on wind rating and insulation
Related: If you’re building an enclosed vehicle/work space, start here: Metal Garages.
2026 Price Breakdown: DIY Kit vs Installed
National ranges
| Scope | Price per sq ft | 30×40 total |
|---|---|---|
| DIY kit only | $15–$25 | $18,000–$30,000 |
| Installed shell | $24–$43 | $28,800–$51,600 |
Ranges reflect typical market guides and assume “average” wind–snow loads. High-wind coasts and heavy-snow counties run higher.
What moves your price
| Feature | Typical impact on a 30×40 |
|---|---|
| Frame gauge upgrade (example: 14-ga to 12-ga) | Often increases cost, but improves strength in higher-load areas |
| Roof style (horizontal to vertical) | Often adds materials/labor, but sheds water and snow better |
| Eave height (every 2 ft taller) | More steel and bracing |
| Roll-up doors (size + wind rating) | Door size and wind rating can swing pricing significantly |
| Walk door (36×80 steel) | Adds cost; fire-rated or glazed doors cost more |
| Windows (3×4 typical) | Adds cost; thermal packages cost more |
| Insulation (roof-only vs full wrap) | Roof insulation helps condensation control; full wrap improves comfort |
| Engineering/certification | Often required for permitting in strict wind/snow/seismic areas |
Also read: Metal Building Roof Styles
Engineering & Permits by Region
The short version: your local building department (AHJ) typically enforces an I-Code edition with local amendments and structural loads tied to ASCE 7. Coastal areas care about wind and debris exposure. Mountain and northern areas care about ground snow load. Seismic matters in parts of the West.
Before you finalize a design, confirm your local hazards: Check snow & wind loads.
Wind and snow basics to plan for
- Hurricane-prone coasts: doors and connections often need wind ratings to match local requirements.
- Snow country: ground snow loads can vary widely by county and elevation, not just by state.
Permit-ready checklist
- Site plan with setbacks, driveway, and utilities marked
- Foundation detail (slab or piers), plus frost depth notes if applicable
- Signed and sealed drawings showing design loads per your AHJ
- Door and window wind ratings (where required)
- Anchoring and uplift details
- Energy or insulation notes if required by local amendments
Helpful next step: Site Preparation Guide and Ordering Process.
State-by-state quick notes (fast scan)
- AL: Mixed wind inland, higher along Mobile–Baldwin. Ask for door wind ratings on the coast.
- AK: High snow and deep frost. Sealed foundation and roof load calcs often expected.
- AZ: Low snow except high country. Check local wind in open terrain.
- AR: Moderate wind. Frost depth often 12–24 in.
- CA: Seismic and strict energy requirements in many areas.
- CO: Snow varies by county and elevation, can be very high in the Rockies.
- CT: Snow and energy requirements are strict.
- DE: Coastal wind exposure near the bays.
- FL: Hurricane wind and debris region, plan for wind-rated doors and connections.
- GA: Moderate wind, shallow frost.
- HI: Wind and corrosion protection matter on the coasts.
- ID: Snow and seismic both matter depending on county.
- IL: Snow and deeper frost common.
- IN: Snow moderate, frost depth often 30–36 in.
- IA: Snow moderate.
- KS: Wind exposure in open terrain.
- KY: Mixed conditions, check local amendments.
- LA: Gulf wind and uplift on the coast.
- ME: Higher snow loads, plan insulation and ice management.
- MD: Coastal wind in east, more snow inland/west.
- MA: Higher snow and strict energy code.
- MI: Snow and deeper frost typical.
- MN: High snow and deep frost, verify snow load and footing depth.
- MS: Moderate wind, higher along the coast.
- MO: Mixed winds, frost increases northward.
- MT: High snow in mountain counties.
- NE: Wind exposure, snow varies.
- NV: Snow in the north/high elevations, wind in basins.
- NH: Higher snow, sealed roof calcs common.
- NJ: Coastal wind along shore, more snow inland.
- NM: Wind exposure, snow at elevation.
- NY: Snow upstate/north; NYC uses its own code administration.
- NC: Coast has wind, mountains have snow, piedmont moderate.
- ND: High snow and deep frost.
- OH: Snow moderate, frost depth often around 32 in.
- OK: Wind exposure, tornado-related design conversations common.
- OR: Seismic in western valleys, snow at elevation.
- PA: Snow varies, energy code applies.
- RI: Coastal wind, more snow inland.
- SC: Coastal wind increases toward the Lowcountry.
- SD: High snow and frost depth.
- TN: Mixed conditions, check local requirements.
- TX: Gulf wind on coast; Panhandle/Hill Country can differ (wind and occasional snow).
- UT: Snow in mountains and seismic along the urban corridor.
- VT: Higher snow, sealed drawings common.
- VA: Coastal wind east, snow in the Appalachians west.
- WA: Seismic west side, snow in Cascades and northeast.
- WV: Snow at elevation, moderate elsewhere.
- WI: Snow and deep frost typical.
- WY: High wind exposure and mountain snow.
Three Real-World 30×40 Configurations
| Package | Who it fits | Spec highlights |
|---|---|---|
| Good – Workhorse Garage | Homeowners, small farms | 14-ga frame, 10 ft eave, vertical roof, (2) 10×10 doors, (1) walk door, roof insulation only |
| Better – Shop-Ready | Contractors, hobby shops | 12-ga frame, 12 ft eave, vertical roof, (1) 12×12 + (1) 10×10, (2) windows, more insulation |
| Best – Wind/Snow Certified | Coasts or mountain counties | Engineered for AHJ loads, upgraded bracing, wind-rated doors, full wrap insulation, heavier anchors, sealed plans |
Lead Times & Delivery Factors
- Standard installs: often 4–6 weeks in normal seasons, and 8–10+ weeks in peak or remote areas. Weather and permitting can add time.
- Rigid-frame PEMBs: design–fab–ship often 6–12+ weeks after approvals. Plan ahead for anchor bolt placement and slab cure time.
Avoid delays: Site Preparation.
Financing & Price-Lock Options
- Financing: explore EMB’s options here: Financing
- Rent-to-Own (RTO): learn how it works: Rent-to-Own
- Price-lock: many buyers lock pricing with a deposit while they finalize site prep and permits. Ask what the lock period covers and get it in writing.
Configure a 30×40 and Get an Itemized Quote
Ready to see your exact number with your doors, height, loads, and foundation plan?
- Use the 3D Design Tool
- Or call (208) 572-1441
- Or send details here: Contact Us
If you message your zip code, eave height, door sizes, and whether you need a slab quote, we’ll return an itemized quote with certified specs for your county.

A 40x60 metal building gives you 2,400 square feet. That’s enough room to park equipment, move around comfortably, and still have space left over. That’s why this size keeps coming up again and again.
40x60 Metal Building Prices in 2026
40x60 metal building not too small, and not too big. For a lot of buyers, it’s a safe size that works in almost any application. In 2026, though, pricing isn’t as simple as grabbing a flat rate and moving on. Design choices, location, and site conditions all affect the final number, and knowing what to look for can save you big time.
This guide lays out realistic costs and what’s usually included with your purchase.
Key Takeaways (TL;DR)
- What a 40x60 building actually gives you in usable space
- Why this size works for so many different applications
- General price ranges you’ll see in 2026
- What’s normally part of the base package
- Common items that increase the total cost
- How local requirements quietly affect pricing
How People Use a 40x60 Metal Building
Most people don’t build a 40x60 with just one narrow plan in mind. They pick it because it keeps options open. These buildings are regularly used for:
Agriculture
On farms and rural properties, this size is often used for equipment, feed, or storage. There’s enough width to move machinery without constantly backing up and repositioning.
Residential Vehicle Storage
RVs, boats, trailers - this size handles all of it. Many owners are surprised by how much extra room they still have once the main vehicle is parked.
Workshops
A 40x60 works well as a shop because everything doesn’t end up stacked together. Tools, benches, and work areas can spread out instead of competing for space.
Commercial Projects
Contractors and small businesses use this size for storage, staging, or light operations. It’s large enough to function professionally without feeling oversized.
What’s Included in a 40x60 Metal Building Price
There’s no single correct price for a 40x60 metal building. In 2026, most buyers fall somewhere between $11 and $25 per square foot for a base structure.
That range usually covers the building shell, not the entire finished setup. Below, we’ll explore what’s included in a base metal building and what’s not:
| What’s Included | What’s Not Included |
|---|---|
| Steel framing and main structure | Concrete slab or foundation |
| Roof and wall panels | Site prep or grading |
| Trim, fasteners, anchors | Electrical or plumbing |
| Basic engineering | Permit costs |
| Standard load ratings | Insulation upgrades |
The 5 Biggest Cost Drivers for 40x60 Metal Buildings
Two buildings with the same footprint can end up priced very differently. These are the usual reasons.
Size
Your building size will be the number one factor that influences its cost. The bigger the building, the higher its price tag will be.
Roof Style
Boxed eave roofs are usually cheaper and work fine in many regions. Vertical roofs cost more but handle rain and snow better over time.
Doors
You’ll be able to choose the size and number of roll-up doors and walk-in doors for your structure, but it will affect its overall cost.
Foundation Prep
Clearing your building site and laying a foundation are a large part of your total metal building project price.
Insulation
Insulation isn’t required, but it changes how the building can be used. Higher insulation levels raise the upfront cost but can improve comfort and do more for keeping your vehicles safe from moisture.
Permits, Engineering, and Why Your Zip Code Matters
Location plays a bigger role than most people expect. Two identical buildings can have very different requirements depending on where they’re built, and two different prices.
Some areas require stamped plans or specific anchoring systems. Those requirements affect engineering and material specs.
Higher wind or snow ratings mean heavier framing and more bracing. That increases cost, but it also increases durability. (ASCE Hazard Tool)
FAQs About 40x60 Metal Building Costs
How much is a 40x60 metal building per square foot in 2026?
Answer: Most land costs between $11 and $25 per square foot, depending on options and location.
What’s included in a metal building kit?
Answer: Usually, the steel structure, panels, trim, fasteners, and basic engineering. Foundation and installation are separate.
Do I need a concrete slab for a 40x60?
Answer: Not always. Agricultural and storage buildings often use gravel. Shops and garages usually use concrete.
How much does a concrete slab cost per square foot?
Answer: Most slabs fall between $6 and $10 per square foot, depending on thickness and site conditions. (ACI concrete floor & slab guide, NRMCA joints in slabs-on-grade)
Does wind or snow rating change the price?
Answer: Yes. Higher ratings require stronger materials and additional engineering.
How long does delivery and installation take?
Answer: Delivery usually takes a few weeks. Installation can range from several days to a couple of weeks.

Your garage is more than a parking spot; it’s an extension of not just your home but also your personality. It speaks for itself. This is your storage hub, workshop, a space full of future potential & ideas, and definitely a home to your cars.
Quick Actions (Fastest Next Steps)
- Design & price online: Use the 3D Building Designer
- Get a Free Quote: https://www.engineeredmetalbuildings.com/contact-us/
- Call Now: (208) 572-1441
- Flexible payments: Financing | Rent-To-Own
TL; DR: Quick Takeaways
Essential facts you should know:
- Single Car: Think of a 12x20 as the absolute tightest fit. It'll do the job, but just barely. If you can, stretch it to a 14x24.
- Two Cars: Yeah, a 20x20 is what everyone builds. If you want a garage that works harder, aim for 24x24.
- Three Cars: A 32x22 works for three sedans. But let's be real, we drive trucks and SUVs now. Do yourself a huge favor and upgrade to 36x24.
- A Word on Doors: If you're going for two cars, fight for two separate 9-foot doors with a solid wall between them.
- Here's the Real Secret: The magic of a great garage isn't its width- it's its depth. That space behind where your bumper stops? That's your gold mine. Plan for extra room back there.
Choosing the right size isn’t just an instinctive decision or squeezing your car in; it’s about creating a functional space that works for your lifestyle and boosts your property’s future value.
Here’s a simple guide to help you understand the available garage sizes, door dimensions, and more, so you can be confident when you plan what fits you best!
Planning Tip (Before You Finalize Size)
Picking the Right Garage Size
Following are the steps that help decide the right garage size for you-Step 1: Measure Your Vehicles
Measure the dimensions of your vehicles and add a 3-foot in front & behind, and 2.5 feet on the sides. This gives ample space for ventilation, easy exit & entry with movable area.
Step 2: Choose Your Door Layout
The functionality of a garage depends hugely upon the entry & exit points. For two cars, options between a 16-foot-wide door or two separate 8-9-foot wide are ideal. Two doors provide a much cleaner look with a supportive center column, curbing weather issues and simplifying repairs.
Step 3: Plan for Depth & Storage Zones
Don't make the number one garage planning mistake: forgetting about the depth. Sure, your car fits now, but where does the lawnmower go? The bikes? The holiday decorations? By adding a few extra feet of depth- 24 to 26 feet total- you create a "buffer zone" at the front or back.
Want a Garage That Doubles as a Shop?
Garage Sizes by Uses
Here’s a detailed breakdown of standard garage sizes and their ideal use cases.1-Car Garage
- Minimal Fit (12'x20'): Fits your car, but that’s it. Getting in and out is a squeeze.
- Comfortable Pick (14'x24'): Room to open doors easily + space along the wall for bikes or storage.
- Door Tip: Go for a 10-foot-wide door- it makes pulling in much easier.
2-Car Garage
- 20x20 feet (Minimum): Fits two cars, but it's a tight squeeze. You'll be climbing out carefully to avoid dinging doors.
- Comfortable/ Recommended Size: 22 ft. x 24 ft. This is a significant improvement, offering more shoulder room between vehicles.
- Family’s Favorite: This is the size that actually works for real life.
- Door: A 16-foot-wide door or, two 9-foot-wide ones.
3-Car Garage
- ‘Standard’ Size: 32 feet x 22 feet. This layout typically fits three cars in a row, but depth can be tight for larger vehicles.
- Better/ Recommended Size: 36 feet x 24 feet. The extra width and depth are worth the investment. It comfortably accommodates three larger vehicles (like trucks and SUVs) and provides essential storage space. T-shaped layouts are also popular for a third bay dedicated to a boat or workshop.
4-Car Garage
- Baseline Size: Starts around 40 feet x 20 feet, but this is highly customizable.
- Common Layouts:
- Parallel (4-in-a-row): A long rectangle, ideal for straightforward parking.
- Double-Deep (Tandem): Two bays deep, perfect for storing seasonal vehicles or creating a dedicated workshop space behind daily drivers.
- With Traffic Lanes: For easy manoeuvring of boats or RVs, include extra width for turning lanes.
Also Read: 30x40 Metal Buildings
Ready to see pricing ranges?
Garage Door Sizes Explained
The right door is as important as the garage itself. Use this [matrix](/garage-door-size-chart) as your guide.- 1 Car: a 9’ or 10’ door’s great.
- 2 Cars: a 16’ door’s standard.
- Door Height:
- Standard: 7 feet. Often too low for modern vehicles.
- Recommended: 8 feet. This is a smart upgrade that easily clears lifted SUVs, trucks with roof racks, and minivans.
Attached Vs. Detached Garages
- Attached Garage: Offers direct access to the home as well as convinience. It offers superior climate control and is usually less expensive to construct. It can, however, be noisy.
- Detached Garage: Offers excellent segregation, perfect for noisy hobby areas, and rental apartments. Prefabricated metal detached garages, are ready in a matter of weeks, and gives you a significant advantage in terms of lead time and construction.
Get Help Choosing the Right Layout
- Get a Free Quote: https://www.engineeredmetalbuildings.com/contact-us/
- Call: (208) 572-1441
What’s the Right Garage Size?
| Garage Type | Minimum Dimensions | Ideal Dimensions | Perfect For |
|---|---|---|---|
| 1-Car | 12' x 20' | 14' x 24' | A single car. |
| 2-Car | 20' x 20' | 24' x 24' | Families with two cars, additional storage. |
| 3-Car | 32' x 22' | 36' x 24' | Bigger families, trucks, or anyone with hobbies or growing needs. |
| 4-Car | 40' x 20' | Custom-made (e.g., 40'x30') | Car collections, boats, or massive equipment or storage. |
Want to lock in a plan today?
- Design it in 3D: https://engineeredmetalbuildings.sensei3d.com/
- Ordering steps: https://www.engineeredmetalbuildings.com/ordering-process/
Let’s Build a Garage You’ll Love!
Getting stuck with a garage that you regret later is a real thing. Use this guide to make an informed choice, or contact us to receive a quote for a space that truly suits your needs.Call: (208) 572-1441
Request a Free Quote
We’re here to guide you, clarify your doubts, and help you choose what’s best for you!

Most people don’t set out to buy a carport. They just reach a point where leaving things exposed stops making sense. Sun damage. Weather. A vehicle that’s nicer than the one before it. That’s usually what spurs an owner to start mulling over a structure.
Metal carports offer some of the most appeal because they’re simple. However, where people get caught off guard is the cost. Your structure’s size, roof style, ground conditions, and local rules will all have a say in the final price tag.
If you’re actively shopping, start here: explore EMB’s metal carports and compare options in the Shop as you read.
What’s the Difference Between a Carport and a Metal Garage?
Carports and garages serve different purposes, even when they look similar from the road. How do they differ?
- Carports are open. Posts, a roof, and airflow on the sides.
- Metal garages are enclosed, with walls, doors, and framing to match.
- Carports cost less because there’s less steel and less labor involved.
- Garages cost more, but you gain security, storage, and full weather protection.
Want enclosed storage instead? See EMB’s metal garages for common sizes, layouts, and use cases.
The Cost of a Carport in 2026
In most cases, you can expect a metal carport to range between $11 and $25 per square foot, depending on the structure and the add-ons you choose.
(For additional national cost benchmarks, see the sources linked below.)
| Type | Typical Size | Average Price Range |
|---|---|---|
| Single-Car Carport | Around 12’ x 20’ | $2,640 – $4,800 |
| Two-Car Carport | Around 18’ x 25’ | $4,950 – $9,000 |
| Three-Car Carport | Around 24’ x 30’ | $7,920 – $14,400 |
| RV Cover | Wider and taller, 35' to 45' long | $4,000 – $9,000 |
Shopping tip: if you already have a target size, you can browse size-focused pages like Two-Car Carports or Three-Car Carports.
What Affects a Carport’s Price?
In the end, two similar-looking carports can end up priced very differently.
Things that tend to move the price:
- Size
Wider spans and taller legs use more steel.
- Roof Style
Regular roofs cost less; vertical roofs add cost but handle weather better.
Need help deciding based on weather? Use EMB’s guide to check snow and wind loads.
- Steel Thickness
Heavier gauge steel raises the price and the strength.
- Enclosure Level
Even partial sides or end panels change the material and labor needs.
Foundation Costs
The ground underneath the carport doesn’t get much attention, but it should. Poor site prep causes more headaches than almost anything else.
Common site-related costs include:
- Clearing and Grading
You’ll need to clear and grade the site to guarantee that it’s level.
- Drainage
Choose a location that sits above natural water runoff and design ample drainage to prevent flooding.
- Foundation Options
Pick between soil, gravel, asphalt, and concrete slab foundations depending on your needs and budget.
For a step-by-step checklist, use EMB’s Site Preparation Guide.
- Permits
Some building officials will want drawings, load ratings, or certification paperwork. This can affect your project costs.
Carports vs. Metal Garages
Even at the same size, metal carports and garages are built differently and carry their own advantages:
| Carports | Metal Garages | |
|---|---|---|
| Starting Cost | Lower | Higher |
| Materials | Roof, Columns | Roof, Columns, Walls, Doors |
| Permitting | Often simpler | Stricter |
| Best for | Standard vehicle coverage | Securing vehicles and equipment |
If your priority is security and storage (tools, equipment, inventory), start with metal garages. If your priority is fast coverage at a lower entry cost, start with metal carports.
Budgeting Your Metal Carport Project
Most budget issues come from changes made late in the process. Planning ahead keeps costs predictable.
A few ways people keep prices in check:
- Choose the right size early, even if it feels slightly larger than you need today.
- Match the roof and foundation to your climate, not just appearance.
- Handle site prep correctly so installation doesn’t stall or need rework.
If you need flexible payments, review EMB’s Rent-to-Own program.
EMB Metal Buildings Is Your Source for High-Quality Metal Carports
A carport may be simple, but choosing the wrong one can still be expensive. Getting the size, height, and roof right the first time makes a huge difference long term. And EMB Metal Buildings wants to help you get the best structure for the job.
Every metal carport and garage we design is engineered to hold up to local wind and snow requirements, and made to last for decades with the right care. It doesn't matter whether you're designing a backyard boat cover or a massive commercial garage; we can make it happen.
Next steps:
- Design and compare options in the Shop
- Learn what happens after checkout in the Ordering Process
- Confirm local loads using the ASCE Hazard Tool (also referenced in EMB’s load-check guide)
Call our experts today at (208) 572-1441 for a full tour of our design process. We’ll answer all your questions and help you create the structure you’ve been waiting for.
FAQs about Metal Carports
Once metal carport pricing comes up, the same questions usually follow. So, we've gone ahead and answered the ones we see the most:
How much does a carport cost on average?
Answer: Many standard builds land somewhere between $1,500 and $4,000 depending on size and options, but installed pricing can vary a lot by region, site conditions, and certification needs. (See sources below.)
How much does a metal carport cost installed?
Answer: Installation is often included, but the total cost depends on site prep and foundation needs.
What size carport do I need for a truck or SUV?
Answer: Most trucks and SUVs are comfortable in a carport at least 12 feet wide and 20–25 feet long.
Does a carport need a concrete slab?
Answer: Not always. Many are installed on gravel or with ground anchors.
Do I need a permit for a carport, and what will the building department ask for?
Answer: That depends on the location. Expect questions about size, placement, and wind or snow ratings. Many jurisdictions reference code language similar to the IRC “carports shall be open on not less than two sides.” (Reference: IRC R309.2)
What is a certified carport, and when is it required?
Answer: Certified carports meet specific engineering standards and are often required in regulated areas or higher wind/snow regions. A quick first step is checking your local loads with the ASCE Hazard Tool.
What roof style is best for snow or heavy rain?
Answer: Vertical roofs tend to perform better in harsher weather because they shed water and snow more effectively.
Can I enclose a carport later, and how does that affect permitting?
Answer: Usually yes, but enclosing it can trigger new permit requirements. Planning ahead helps.

If you’re trying to decide between a metal carport and a metal garage, the right answer depends on how you use your space, your weather, and how much security you actually need. Both protect vehicles and equipment, but they solve different problems.
Carports vs. Garages
While many folks may lump metal carports and metal garages into the same category, these building types serve two distinct purposes and offer different advantages for their owners. One provides coverage from sun and rain, while the other delivers enclosed security.
Which one is right for you? That can be a hard question to answer. But with the right information, you can make the best choice for your next project.
Below is a real-world look at how metal garages and metal carports stack up, and which features matter most for your property.
What’s the Difference Between a Metal Carport and a Metal Garage?
Metal garages and metal carports are very similar in many regards, but they serve different functions. Both offer coverage, but only one provides true security.
- Metal carports are open, usually with a roof and exposed sides. (Explore: Metal Carports)
- Metal garages are fully enclosed, wall-to-wall. (Explore: Metal Garages)
- Metal garages have doors and can include windows, which allow you to lock them and control airflow.
- If you’re storing anything you’d be upset to lose, a garage makes more sense than a carport.
- Combination buildings split the difference, offering open parking with enclosed sections for storage or equipment. (See: Utility Buildings)
Comparing Metal Garages and Metal Carports
How do metal garages and metal carports stack up against one another?
| Feature | Metal Carports | Metal Garages |
|---|---|---|
| Weather Protection | Good for sun and light rain | Handles wind, rain, snow, and debris |
| Security | No real barrier | Enclosed and lockable |
| Storage Capability | Limited and exposed | Works for tools, vehicles, and equipment |
| Permitting Likelihood | Often easier | More likely to require permits |
| Project Timeline | Faster install | Takes a bit longer |
9 Real-World Factors That Can Help You Decide Which Is Right for You
Still unsure about which structure type is best for you? Below are real-life scenarios that can help you choose.
- Local Weather
If weather is mild most of the year, a carport can be enough. If you deal with heavy snow, strong wind, or regular storms, a garage tends to earn its keep. (Helpful: Snow & Wind Load Guide)
- Security Needs
Carports are convenient. They’re also wide open. Garages give you a door to close and lock, which is the first and foremost need for security.
- Moisture and Condensation
Open sides help moisture move through naturally. Garages can work just as well, but ventilation becomes something you actually have to think about.
- Access and Workflow
Carports are easy. No doors. No steps. Garages are better when you want order, separation, or a place to work without exposure.
- Budget
Carports usually cost less up front. Garages cost more, but you’re paying for walls, security, and usable indoor space. (Options: Financing and Rent-To-Own)
- Future Needs
Most people underestimate how quickly storage grows. Garages handle change better. Carports work best when the plan is simple and stays that way.
- Permits
Carports often slide through with fewer questions. Garages don’t always. Local rules matter here more than anything else.
- Site Prep
Carports are lighter and simpler. Garages need a bit more prep to support walls, doors, and enclosures. (Prep tips: Site Preparation)
- Resale Value
A garage usually feels like real square footage to buyers. A carport feels more temporary, even when it’s well-built.
Best Picks by Case
Some situations can make the choice between a metal carport and a garage pretty easy.
- Homeowners
If you just want coverage, a carport works. If you want storage, workspace, or something that feels permanent, a garage fits better.
- RV Owners
Carports are common because of their height and easy access. Garages make sense for smaller RVs or long-term storage. (Explore: RV Carports)
- Farm and Ranch
Carports are great for equipment that’s in and out all day. Garages are better for tools, supplies, and anything that can’t get wet.
- Small Businesses
Garages offer flexibility and are ideal for storage, inventory, equipment, and even light work. Combination buildings are popular here for a reason.
FAQs About Metal Garages and Carports
Do you have questions about metal carports and steel garages? Below are answers to common questions we see from buyers.
Is a metal carport cheaper than a metal garage?
Answer: Usually, yes. Less material. Less labor.
Can I enclose a carport later?
Answer: Often you can, but it’s easier if it’s planned that way from the start.
Do I need a permit for a carport or garage?
Answer: Depends on where you live. Garages are more likely to require permits.
What makes a structure a “carport” in code terms?
Answer: Open sides. That’s the big thing.
What size carport fits a full-size truck?
Answer: Around 12 feet wide and 25 feet long works for most trucks.
What size garage fits two vehicles plus storage?
Answer: A 24 x 30 garage is a common go-to.
Is a fully enclosed metal garage better for storms and snow?
Answer: Yes. Enclosure makes a real difference.
Should I choose vertical roof panels for heavy rain or snow areas?
Answer: Most of the time, yes. Water and snow shed better that way.
EMB Metal Buildings Is Your First Stop for High Quality Metal Buildings
Finding the right steel structure doesn’t have to be complicated. With EMB by your side, you’ll get the building type you need at a price you can afford. Our structures are built with quality steel components, engineered for local conditions, and designed to fit your exact use case.
Ready to start building? Call our experts at (208) 572-1441 for more information, or use our online tools to explore options and pricing.

People often toss around the word "gauge" when discussing metal buildings, but few stop to consider what it really means. For steel, its gauge is a system of determining how thick it is. The smaller the number, the thicker the material.
What Is Gauge?
Most metal buildings utilize 14-gauge steel for their framing. It’s light, sturdy, and can hold its own in most scenarios. However, some environments with higher wind speeds and snowfall demand thicker 12-gauge framing to carry the load and pass local building requirements.
And while you might not notice much of a difference in performance at first, that beefier framing makes it a lot harder for nature to bend or twist your structure out of shape.
Key Highlights
- 12-gauge = thicker and stronger
- 14-gauge = good for most small to mid-size builds
- Lower gauge = better wind and snow performance
- 12-gauge holds shape longer under stress
- Often comes with a better warranty
- Price bump is small compared to the upgrade in strength
Steel Gauge Chart
| Gauge | Inches | Millimeters |
|---|---|---|
| 8 | 0.164 in | 4.17 mm |
| 10 | 0.135 in | 3.43 mm |
| 12 | 0.105 in | 2.67 mm |
| 14 | 0.075 in | 1.90 mm |
| 16 | 0.060 in | 1.52 mm |
| 18 | 0.048 in | 1.21 mm |
| 20 | 0.036 in | 0.91 mm |
| 22 | 0.030 in | 0.76 mm |
| 24 | 0.024 in | 0.61 mm |
| 26 | 0.018 in | 0.46 mm |
| 28 | 0.015 in | 0.38 mm |
| 30 | 0.012 in | 0.30 mm |
How Gauge Impacts Loads
Thicker framing doesn’t just sound tougher. It is tougher. Heavier steel stands up better to snow buildup, hard gusts, and the added stress from longer spans.
Engineers run the numbers for wind and snow loads based on ASCE 7 standards. Using this system, buildings can be rated for anywhere from 115 to 170 mph winds and 20–60 psf snow loads.
The local requirements for wind and snow loads depend on location, open exposure, and roof pitch. For example, a building sitting on a hill or near the coast deals with more pressure than one behind trees.
Upgrading to 12-Gauge Framing
At what point should you consider upgrading?
- High Wind Speeds
If your metal building will sit in an area with high wind speed calculations, you may need to upgrade to thicker framing to prevent swaying or failure.
- Heavy Snow Regions:
If you expect to see your fair share of deep snows this winter, upgrading your framing thickness is a smart move.
- Longer, Bigger Buildings:
Longer spans put more stress on the frame of your pre-engineered metal building.
- Certification Needs
Higher wind or snow ratings often call for thicker 12-gauge.
- Lower Maintenance:
Thicker steel can last longer and require fewer repairs over the course of its life.
Cost and Warranty Changes with Framing Upgrades
You can expect a small price increase when you upgrade from 14-gauge to 12-gauge framing. You pay for thicker steel, heavier anchors, and reinforced braces to match it. Usually, you’re looking at around 10–15% more on the framing side.
However, that extra spend often gets you a longer rust-through warranty, sometimes 25 years instead of 20. The thicker galvanizing takes longer to wear down, especially in damp or coastal areas.
So, while the up-front cost stings a little, you’re getting fewer repairs, less movement, and a frame that won’t quit early. In the long run, it’s usually worth every bit.
Frequently Asked Questions about Framing Gauges for Metal Buildings
Do you have questions about framing gauge, and which thickness is best for you? Below, we’ve answered some of the questions we see on this subject the most:
Is 12-GA stronger than 14-GA?
Answer: Yeah. It’s thicker, heavier, and stiffer under load.
What’s the real thickness difference?
Answer: 12-ga steel is about 0.1046 inches thick, while 14-ga runs around 0.0747 in.
Does 12-GA automatically mean better wind or snow ratings?
Answer: Not by itself. The full design, including anchors, trusses, and layout, plays a role. But thicker framing helps you hit higher numbers.
Does the 20-year rust warranty only cover 12-GA?
Answer: Usually, the heavier gauge gets longer coverage. Some 14-ga options still offer 20 years, but 12-ga often goes a few years beyond that.

The roof over your head is a deciding factor in your peace of mind and sense of security. Choosing the one that's not just sturdy, but actually fits you perfectly is one of the most critical decisions you'll make. It's about aesthetics, what you feel most comfortable and secure in, as well as performance, durability, and long-term value. The style and orientation of your roof panels directly impact how your building handles rain, snow, wind, and debris.
This guide will break down the differences between Regular, A-Frame Horizontal, and Vertical roof styles to help you make an informed choice that ensures better functionality and protects your investment for years to come.
TL; DR: Quick Takeaways
- Vertical Roof is the top performer for harsh weather (snow, heavy rain, high wind) and longer buildings, but it costs more.
- Regular Roof is the most budget-friendly option, best suited for mild climates and smaller structures.
- A-Frame Horizontal offers the classic house-like look at a lower cost than vertical, but shares the limitations of horizontal panels.
- Building length over 31 feet? Choose a Vertical roof to minimize leak-prone seams.
- Panel orientation matters: Vertical panels shed water and debris dramatically better than horizontal panels.
- Roof noise is solved by insulation, not the roof style itself.
Regular vs A-Frame vs Vertical Roof Style
| Aspect | Regular Roof (Rounded Horizontal) | A-Frame Horizontal (Boxed-Eave) | Vertical Roof |
|---|---|---|---|
| Description | Simple design with curved eaves; panels run horizontally. | Traditional "house-like" appearance; panels run horizontally. | Panels run from ridge to eave; requires a standing seam or batten cap. |
| Pros |
|
|
|
| Cons |
|
|
|
| Best Use Cases |
|
|
|
| Relative Cost | $ | $$ | $$$ |
How Panel Orientation Affects Drainage & Maintenance
The direction your roof panels run isn't just for looks- it fundamentally changes how your roof performs.
- Drainage: Vertical panels channel rain, snow, and pine needles off the roof. Whereas, Horizontal panels have laps where water jumps across, trapping leaves & debris, leading to stagnant pools and corrosion.
- Gutters: The straight, downward flow of a vertical roof aligns with the gutters and downspouts, which minimizes messy splash-back on your the doors & siding. Horizontal roofs can cause water to sheet unevenly off the eave.
- Noise: Worried about rain being louder on a metal roof? The orientation matters less than you think. Proper insulation is the key. A layer of 2-inch fiberglass or spray foam effectively eliminates the "drumming" effect, making any metal roof comfortable and quiet.
What Are Three Metal Building Roof Styles?
Understanding the core options is your first step.Regular (Rounded Horizontal): Most common and economical.
- It's got curved eaves and horizontal panels- simple and fast to install.
- Suitable for mild climates with low wind and rain
- Not a great choice if you're constantly dealing with heavy snow in your area. There's a risk of leaks at various horizontal seams.
A-Frame Horizontal (Boxed-Eave): Want the look of a traditional house roof?
- Gives you that classic peaked appearance. However, the panels still run horizontally.
- Great for curb appeal in mild zones, but it shares the same performance and length limitations (typically capped around 31') as a Regular roof.
Vertical Roof: This is the premium, high-performance option.
- The panels run vertically from the ridge down to the eaves. This system requires additional structural support (hat channels or purlins) and a special ridge cap.
- Best for handling snow, rain, and high winds, and is essential for longer buildings, while versatile for all.
- The enhanced performance comes with a higher price tag due to the extra steel and labor involved.
Also Read: Standard Garage Sizes
When to Choose Which Style?
Your local climate, budget, and building dimensions will point you to the right choice.
- If building length > 31′: Choose Vertical- avoids dozens of leak-prone horizontal seams across the slope of your roof.
- If heavy rain/ snow/ wind or lots of trees: Choose Vertical- gives superior drainage and added structural strength, worth the investment.
- If mild climate + tight budget: Choose Regular or A-Frame Horizontal- if you want it to match the look of your home.
Cost, Maintenance, and Payback
Why Does a Vertical Roof Cost More?
The price difference comes down to materials and labor. A vertical roof system requires additional structural components like hat channels or purlins to create the vertical seams, a more complex ridge cap, extra trim, and more fasteners. This also translates to more labor time for installation compared to the straightforward panel laying of a horizontal roof.
The Maintenance Reality
Your long-term cleaning effort is also affected by the style. A horizontal roof will need more periodic blowing off or rinsing to clear debris trapped in the panel laps. A vertical roof, with its efficient shedding, typically means fewer ladder trips and less worry about debris-related moisture and damage.
Our Final Word:
At EMB, we understand that your roof is not just a building structure, but your protective shield. We take metal buildings seriously and ensure that you find yourself the sturdiest, most durable and long lasting solution with minimal upkeep.Explore your options with our interactive 3D Builder, or speak directly with our team to get started on your project.

If you have ever priced two metal garages that looked almost identical online, then got two very different quotes, you are not imagining things. One of the biggest reasons is code. The other is load requirements, especially snow and wind.
Local jurisdictions commonly use I-Codes with local amendments, and structural load requirements are tied to ASCE 7 criteria, so the same size building can price very differently from one ZIP code to the next.
As I tell customers all the time, you are not just buying square footage. You are buying a structure that has to stand up to your local weather, match your use case, and make it through the permit process without surprises.
Key Highlights
- Metal building pricing is not based on size alone. Local code requirements, snow loads, wind ratings, roof style, doors, and site conditions all affect the final number.
- ASCE 7 is the nationally adopted loading standard used through U.S. building codes, and it covers snow, wind, rain, seismic, and other design loads.
- The 2024 IBC includes updated wind, earthquake, and snow loads, plus new special inspection provisions for metal building systems.
- The 2024 IRC snow map changed snow loads in many areas, with some locations moving only slightly and others changing by nearly 40 percent.
- Base metal buildings often start in the low teens per square foot, but upgrades like doors, insulation, and location-specific requirements raise the price.
- Higher snow-load requirements often mean stronger framing, heavier gauge options, different anchoring, and more engineering, which increases cost.
Why the Same Size Metal Building Can Have Two Different Prices
A 30x50 metal garage in a mild-weather county may price one way. A 30x50 with the same footprint in a heavy-snow county can cost noticeably more. That is because the second building may need stronger engineering, upgraded framing or panels, a different roof setup, and anchoring matched to the local code and foundation conditions.
This is also why online “starting at” prices should be treated as a baseline, not a promise. A basic structure may start around $13 to $20 per square foot, while many base-shell ranges land roughly between $11 and $25 per square foot before site work, foundation, and major upgrades.
What Building Codes Actually Change
When customers hear “building code,” they often think of paperwork. In reality, code affects the structure itself.
Here are the biggest pricing levers code can change:
1. Required design loads
The building has to be designed for the loads required at your site. In the U.S., ASCE 7 is the core loading standard referenced by major building codes, and it covers snow, wind, rain, seismic, and more.
2. Code edition and local amendments
Not every jurisdiction is on the same edition at the same time. Many jurisdictions use I-Codes with local amendments, which is why your county or city may ask for different documentation than a neighboring area.
3. Risk category and building use
Snow and wind load guide tells buyers to select the correct risk category in the ASCE Hazard Tool, such as a non-residential garage, storage shed, or barn versus a structure meant for people, like a home or office. That matters because use affects the design criteria.
4. Permit package and engineering
A low advertised price usually does not mean “permit-ready for every county.” In many areas, the building department expects full ASCE-based calculations, not just a generic wind mph claim.
What Snow Load Means, in Plain English
Snow load is the amount of snow pressure your roof may need to support safely. That pressure is not just about how many inches of snow you see on the roof. It is tied to code maps, exposure, roof shape, drift potential, and design standards.
ASCE’s Hazard Tool lets users look up key design parameters for hazards including snow and wind and generate free PDF design reports. We point customers to that same tool and specifically tell them to enter the full street address, choose the right risk category, select wind and snow, and share the report with the sales rep.
That matters because snow requirements are not fixed across the country. ICC notes the 2024 IRC introduced a new snow map that changed snow loads in most areas, with some going up, some going down, and a few moving by nearly 40 percent.
How Higher Snow Loads Raise Metal Building Prices
When your required snow load goes up, the building usually needs more structure behind the scenes. That can mean:
- Stronger framing
More demanding loads can require upgraded frame members or different structural sizing.
- Different roof recommendations
A cheaper roof system may be fine in a mild climate, but not the smartest choice where snow hangs around. Boxed-eave roofs are often less expensive, while vertical roofs cost more but perform better with rain and snow over time.
- Heavier anchoring and foundation coordination
Higher loads do not stop at the roof. They transfer through the frame into the anchors and foundation. The anchor and foundation interface as a major cost driver, because soil, asphalt, and concrete conditions are not the same thing.
- More engineering and permit documentation
The stronger the requirement, the more likely your project will need a more specific engineering package for permit review.
Roof Style Matters More Than Most Buyers Realize
A lot of customers shop roof style by appearance. I always tell them that the weather should come first.
Regular roof
This is typically the budget-friendly choice. It can work well in lighter weather areas and for simpler builds where keeping upfront cost low is the priority.
A-Frame or boxed-eave roof
This is the middle ground for many buyers. It usually looks more residential and a bit more finished than a regular roof while staying below the cost of a full vertical setup in many cases.
Vertical roof
This is usually the premium choice, and for good reason. Vertical roofs need additional sub-framing and fastening details, and can cost more, but handle rain and snow better over time.
If you live in a snowy area, or even a wet area with pine needles, leaves, or debris, vertical is often the smarter long-term buy. It may cost more up front, but it can save headaches later.
Real-World Examples
Below, we break down the right building type based on real-life scenarios:
Homeowner in a mild climate
You want a detached metal garage for vehicles, lawn equipment, and weekend storage. Your county has lighter snow demands. A basic roof style and standard engineering may keep the project closer to entry-level pricing.
Farmer in a snow-prone county
You need a barn or equipment garage that can handle stored tractors, feed, and winter conditions. Now the quote may move up because the building needs stronger load capacity, better roof performance, and a permit package that matches local requirements.
Contractor building a workshop
You may need larger door openings, more height clearance, more enclosure, and code-matched engineering for business use. That can mean a heavier structure even before you add insulation, power, or interior finish.
Site Prep and Foundation Costs People Forget
Customers focus on the building and forget the ground under it. But site preparation , drainage, grading, and foundation work can change the total project cost fast. 40x60 and 30x40 cost both separate the building shell from slab, site prep, and permit costs.
That is especially important with snow-load-driven projects, because the stronger the building, the more important the anchor and foundation details become. Never assume a base price includes the slab unless it says so.
How to Keep Code-Related Costs Under Control
You cannot ignore code, but you can avoid wasting money.
Start with your exact jobsite address
Do not to rely on ZIP code alone when checking loads in the ASCE Hazard Tool. Use the full address for better accuracy.
Choose the right building use from day one
A farm storage building, workshop, and occupied commercial steel building space are not viewed the same way in code terms. If you change the use late, your quote can change too.
Pick your roof based on climate, not just looks
Lower upfront cost is not always lower total cost. In snow or heavy-weather regions, a vertical roof often makes more sense.
Do not under-size doors and height
If you later realize your tractor, trailer, or lifted truck needs more clearance, the redesign costs more than getting it right the first time. Larger openings and taller legs are major price drivers.
Budget site prep separately
Treat grading, drainage, slab work, and anchoring as real line items, not afterthoughts. These items are often outside the base building price.
Why This Matters When You Shop With EMB
Pricing varies by size, options, and location, and the best path to accurate pricing is configuring the building for your actual site and needs. EMB offers a 3D Building Designer for configuration and pricing, and our experts can point customers to pages for snow and wind loads, site preparation, ordering, and financing.
So if you are comparing quotes, make sure to ask:
- What load requirements is this quote based on?
- Is the building certified for my area?
- What roof style is included?
- Are anchors and engineering matched to my site?
- Is the foundation included, or separate?
That is how you compare apples to apples.
Final Thoughts
A lower quote is not always the better quote if it is based on lighter requirements than your county actually needs. The smartest move is to price the building for your real address, real use, and real weather from the beginning. Verify your snow and wind loads, configure the building around your site, and get a quote based on your ZIP and specs, not a one-size-fits-all number.
If you are planning a garage, barn, workshop, RV cover, or commercial steel building, start with the load report first. Then build the quote around that.
FAQs
Do snow loads really make a metal building more expensive?
Yes. Higher snow-load requirements usually mean stronger structural components, more engineering, and sometimes a better roof system and upgraded anchoring.
Is a vertical roof worth the extra money?
In many cases, yes, especially in areas with snow, heavy rain, or debris.
Can two buildings with the same size have different prices in different counties?
Absolutely. Local code adoption, ASCE-based load requirements, and permit expectations can change the engineering and the final price.
Is the foundation usually included in the building price?
Usually not.
How do I check the snow and wind loads for my property?
We recommend using the ASCE Hazard Tool, entering the full address, selecting the right risk category, and generating a report to share with your sales rep.
Do I still need to check with my local building department?
Yes. Your local building department determines permit requirements, adopted code version, and any local amendments. We can help you quote the right building, but local approval still matters.
You don’t have to spend weekends driving from one dealer to another or wait days for someone to call you back. These days, you can buy your metal building without ever leaving home.
The process is online now. Faster. More flexible. And you stay in control from start to finish.
Planning a workshop? Need a garage? Maybe a barn? Ordering online saves time, often saves money, and gives you far more options than most local suppliers can offer.
Why More People Are Buying Online
- Shop whenever it works for you.
- Find better deals, with discounts only offered online.
- See more choices in styles, sizes, and layouts than you’d find in person.
Once you start designing, everything’s laid out clearly. Change the size. Switch the roof style. Test out different colors. Every option is right in front of you. When it looks the way you want, you can place your order on your schedule, no pressure, no waiting.
Seamless Online Shopping Experience
Our e-commerce platform is designed to guide you through the process step by step. First, you choose the type of building you need. From there, every option is user-friendly and clearly builds size, lean-tos, roof style, doors, windows, all with live pricing as you make changes. And when you’re done, the checkout is fast. No forms that ask for the same thing twice. No waiting around.You’ll also be able to follow your progress, from start to confirmation.
What stands out:
- The layout is clear, so you know exactly where to begin.
- Prices update instantly as you change features.
- The entire order process only takes a few minutes once you’re ready
Fully Customizable Metal Buildings
Ordering a metal building online isn’t just convenient; it lets you make it exactly how you want it. No sticking to a handful of pre-set models. No “close enough” designs. You can start small with a backyard shed or go big with a commercial building, and everything in between.
From the first click, you’re in control. Change the size. Pick your roof style. Add the number of doors and windows you need. Adjust the colors until they fit your property perfectly. As you make changes, you’ll see the updates instantly on your screen.
There’s also a 3D design tool built in. You can spin your building around, zoom in on the details, and get a clear picture of what it’ll look like before you place the order.
Want specifics? You can choose dimensions like 30×40 or 40×60, or type in your own measurements. Go vertical or regular on the roof. Match the roof, wall, and trim colors to your taste. Add the right openings, frame reinforcements, or both. And with the live 3D view, you’ll see your vision take shape right in front of you.
Certification & Insulation – Built for Where You Live
Metal buildings are built to last, but you can add more protection and comfort depending on how you plan to use the space.
You can order your building with a higher certification rating so it’s engineered to handle those tougher conditions. That rating isn’t just a number, it’s peace of mind that your structure is ready for what your climate throws at it.
Insulation is a smart upgrade if you will be working inside or storing sensitive items that are temperature-sensitive. It keeps summer heat out, brings warmth in during winter, and makes the building space more comfortable overall.
Upgrades include:
- Higher-rated certification — Up to 40 PSF or more, meeting strict building codes.
- Insulation options — Double Bubble for basic thermal control, 2-inch fiberglass for better coverage, or R17 Prodex for maximum efficiency.
Both options are easy to add during design. You’ll see exactly how they fit into your build before you finalize the order.
Transparent Pricing & Flexible Payment Options
You’ll see the full cost of your building right away with no surprises later. This price covers the building itself, installation, and any extras you’ve chosen, like site preparation, color upgrades, or added structural features.
Paying is just as flexible. Put down a deposit or set up monthly financing. Choose what works best for your budget.
From time to time, seasonal discounted sales comes on site. On medium to larger structures, those discounts can really make a difference.
What you’ll notice:
- Clear breakdown – Every part of the order is itemized so you know exactly what you’re paying for.
- Different payment paths – Start with a deposit, or finance it over time.
- Discount opportunities – Watch for promotions, some going as high as 15% off.
The goal is simple: make buying your building straightforward from the very start.
Add-Ons to Make Your Building Work Better for You
Every building starts with a solid base design. You can make upgrades that add strength, improve the design and looks, or extend its lifespan.
If you live in an area where winds hit hard, or you just want a durable setup, you can grab addons that include extra bows or mobile home anchors for added stability. Overhangs are another option - they provide additional coverage on the sides or ends and can alter the building's appearance.
You can also choose to add warranty coverage during checkout. That extra protection can help guard against rust-through or panel issues over time.
Some of the upgrades people often choose include:
- Extra structural support — Additional bows or anchors to reinforce the frame.
- Overhangs — Custom lengths on the sides or ends for more coverage and shade.
- Warranty coverage — Protection for rust and panel wear for longer peace of mind.
Not every project needs these, but in the right situations, they can be a smart addition.
Wrapping Up Your Order
Once your building design is set, the last step is quick. You’ll see a single page showing every choice you’ve made - size, roof style, colors, doors, windows, and any extras.
Take a moment to check it over. If it all looks good, click “Buy Now” and fill in the required details to lock in your order. Right after, you’ll get a confirmation of your order.
From design to checkout, it’s just a few clicks - and you’re done.
Here’s what you’ll get before you finish:
- Order summary – All the specs you picked, listed in one place for easy review.
- Confirmation details – Your delivery timeline and follow-up instructions so you know what to expect.
Visual Tools That Help You Decide
When you’re making a major purchase like this, seeing exactly what you’re getting matters. You want to be confident in your choices before committing — and the design tools make that possible.
You can view your building in 3D and spin it around to check every side. Change the colors. Swap features in or out. Zoom in to see the close details. The building images are sharp enough to show you the trim lines, roofing, and finishes clearly.
With these tools, you’re not guessing — you’re designing with your eyes open.
What’s available:
- 3D viewer – Rotate your design in real time while you build it.
- Detailed product images – See rooflines, trims, and doors up close before ordering.
- Live color selection – Switch colors instantly and preview the changes right away.
It’s the next best thing to standing in front of the finished building — without spending a dollar until you’re sure.
Customer Support & FAQ – Here When You Need Us
Questions happen. Sometimes it’s right at the start, before you’ve even picked a size. Other times it’s mid-checkout, when you want to double-check a detail.
You won’t be left figuring it out alone. We have an FAQ with straight, practical answers - from how to buy a metal building, how to tweak a design, to payment steps, what the lead time is, to what the installers will do on site. No long-winded explanations. Just what you need to know.
If you’d rather talk it through, use the live chat. You’ll be connected with someone who actually knows the process and can walk you through it without making you wait for an email reply.
Here’s what’s in place:
- Live chat – Quick connection to a support rep who can give you clear, direct help
- FAQ section – Plain answers on design options, payment methods, installation timelines, and more.
The help’s there. The moment you need it. So you can keep moving and get your building sorted without the guesswork.
Ready to Start?
Once you’ve had a look at the options, getting your design underway is straightforward. You can start right now, or step away and come back to it later — your progress will be waiting.
Everything is set up to keep the process simple. From customizing your building, to seeing the price update in real time, to checking out - it’s all built for flexibility.
Doesn’t matter if it’s a small backyard shed or a full-scale commercial build — the tools are ready when you are.
Click “Customize Your Building” and take the first step.


